 'm often asked what is the best way to get started in astrophotography.
What camera should I buy? What's the best telescope?
It's not the right question. The right question is: What do you want to
observe, and why do you want to take a picture of it? That will determine
what equipment you need. Of course, beginners might not know what they want.
So they buy the wrong thing, get frustrated, run out of money, and give up.
I've seen many websites with information that's flat out wrong. Then they proudly show you the images they've collected, without realizing that they're terrible. Many other sites discuss the best type of camera or telescope to get. But the biggest risk is the possibility of ending up with one good setup and a pile of expensive junk acquired during the learning stage. The goal of this page is to help you avoid making that mistake.
Mistake #1: Not knowing what you want to observe
There are four main types of objects up there: planets, which are bright but very small; galaxies, which are small and very faint; clusters, which are big but sometimes have faint features; and nebulae, which are gigantic but often invisible to the eye, no matter how powerful your telescope may be. Each requires a different type of equipment. There are also satellites, airplanes, and (maybe) flying saucers. You might be amazed to see some of the junk that's up there.
Mistake #2: Making a fake picture
There's also a fifth type: the pretty picture. If you take a picture of the Milky Way with your friend, or a mountain, or a lake in the foreground, you're actually doing night landscape photography, not astrophotography, despite what your camera vendor says. This kind of photography has a bad reputation because it's often photoshopped, which means the pictures are fake. Sometimes the foreground and the stars have different exposures. Sometimes there's a lake scene and the reflections in the lake don't match the sky. Maybe the Earth rotated between the two sections, or they were shot on different days. The photographer tries to pass it off as ripples.

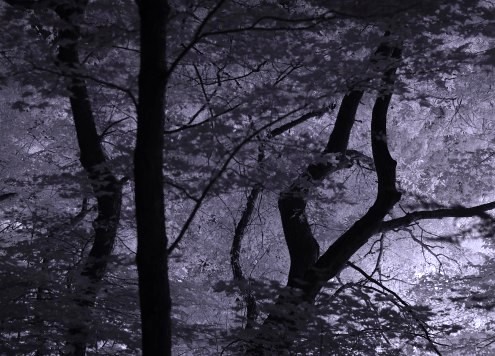
Night photography: Infrared photo of trees back-illuminated by car headlights
Other times people enhance the color so much that everything is saturated. Then they paste their trademark on the image as if they're afraid somebody's going to steal it. Misrepresenting what the sky actually looks like may be beginner enthusiasm, but it's not honest. If all you want is a pretty picture to impress your friends, you might as well just tell ChatGPT to create one for you.
Anyway, these images of a person looking up at the Milky Way while standing in a lake with mountains in the background are now a cliché. The real challenge is to photograph something unique. For example, at right is an infrared picture showing car headlights illuminating the trees at night. Infrared is something only a camera can do.
Mistake #3: Getting the computer to do it for you
These days you can buy a telescope that automatically aligns itself. You tell it what you want it to observe. It automatically points to it, sets the exposure, takes a picture of it, and sends it to all your friends.
They will certainly praise it. If they're experts, they won't want to discourage you. But if you really want to experience the majesty and beauty of the universe, that is the worst way to go. Yes, you'll get a picture. It might even be a nice picture of something, but did you really see it? If experiencing the universe is your goal, you are no closer to it than before. To achieve that, you have to know where things are. I always advise people to start with a pair of image-stabilizing binoculars—not too big, 12×36 is good—and a book of star maps and try to find something. Andromeda, the Orion Nebula, and the Pleiades are a good start. It may take an hour to find Andromeda, but that gray smudge from two million light years away will seem like the most magnificent thing you will ever see.
Eventually, when you get a telescope, put it on a manual alt-az tripod and look around through the eyepiece. When I did it that way, I found an amazing star cluster within five minutes. It was breathtakingly beautiful, and it kept drifting out of the field, but the point is that no computer picture can ever compete with seeing something with the naked eye.
Your goal for the first season should be to get familiar with the constellations and the major stars, how fast they move and in which direction, how big or small things are, and what is interesting to you. Many people growing up in the city have no clue about these things.
Professional astronomers use the computer to save time, but they already know the sky. For a beginner, telling the computer to do all this for you is like asking it to go out on a date for you and send you pictures of how it went.
Mistake #4: Using Photoshop
There are some things an experienced astrophotographer will notice right away: the smoothness of your background, the size, roundness, and coloration of your stars, and whether your highlights fit into your dynamic range or are “blown out.” There are many websites purporting to be from advanced astrophotographers showing the Orion nebula—a deceptively easy target—totally blown out with a solid black background. A good background does not mean solid black. It means a faint but non-blocky background. And please, please don't add diffraction spikes to your stars. If you don't know what a diffraction spike is, good! Keep it that way.
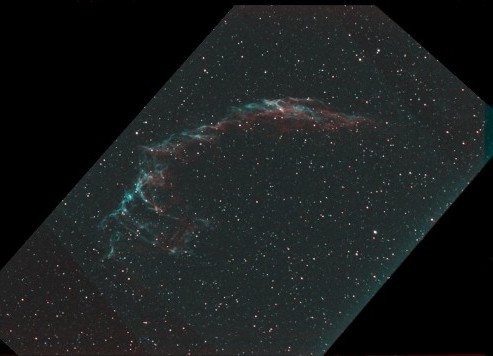
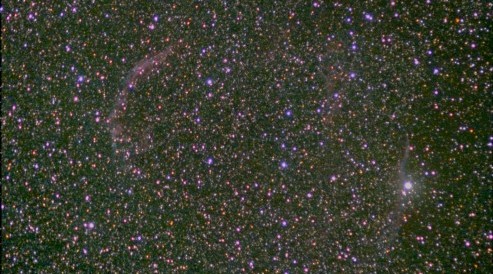
The goal of astrophotography, especially when imaging nebulae, is to make the stars as small as possible. Stars are essentially single points (to a first approximation, not counting Airy disks), so a smaller star is more realistic. Many people don't realize that the purpose of filters is not to make the nebula brighter. They don't. Their sole purpose is to make the stars smaller, and if there's diffuse background from light pollution to make that dimmer as well. You can clearly see the difference by comparing the two images of the Veil Nebula below, taken on the only two days between 2013 and 2024 when it wasn't raining in my area.
If you photoshop it, an expert will be polite, knowing how hard the subject can be, but inwardly he or she will be searching for a polite way to avoid hurting your feelings.
Mistake #5: Using duct tape
Avoid the temptation to use duct tape. Everything needs to be firmly attached together because it will get bumped in the dark and it will get dew on it, and it will start moving by itself. And this may be obvious, but never use WD40 or any other silicone- or oil-based substance anywhere near an optical system.

Veil Nebula (Eastern half, NGC-6992) imaged on a 16-bit cooled astronomy camera using astronomy filters. Notice that the background in the lower left corner appears red. This is caused by the fact that exposures using Hα (red) and OIII filters (blue + green) were done at different times during the night

My first attempt to photograph the Veil Nebula back in 2013 was with a color DSLR (with a 12-bit ADC) modified for infrared, but with no filters. The nebula is an easy target with filters but almost impossible to see without them. Notice how much larger the stars are than in the first image. Also, the optics on my scope focused red to a slightly different point than green or blue, giving the redder stars a red halo. This is impossible to prevent with a color camera. The background is also “chunky,” which is the characteristic sign of a 12-bit color sensor
Mistake #6: Buying the wrong camera
Okay, now for my biggest pet peeve: websites that tell you to buy the wrong kind of camera. One site recommends the Nikon D850. Another recommends a Canon T7i and Nikon D5600. A third suggests Nikon D5300 or Canon Rebel T3i. All wrong! These are all great cameras, but they're unsuitable for astrophotography. Ignore for the moment the choice of APS-C vs full frame. Sure, start out with whatever you already have, but before you buy something new, you need to understand cameras. There are two main types.
One-shot color: If you're ever going to image a nebula, you must have a camera that captures Hα, which is the line for radiative recombination of hydrogen at 6562.8 Å in the far red. Most commodity one-shot color (OSC) cameras have a filter that blocks almost all of that. The Nikon D810a and Canon EOS Ra are the only two I know of that have a special filter that transmits that wavelength. Without it, you're limited to galaxies and stars; and even your galaxies will be dull, drab, dingy, and uninteresting.
Of course, you could do what I did: take your DSLR or mirrorless camera apart and remove the filter yourself. That works, but it's not for the faint hearted.
Monochrome: As you progress, you may discover that some of your stars have a red halo around them. This means the red, green, and blue are focusing at different points. Sure, there are computer tricks you can use to erode the red channel to make it smaller, but there are other problems: the background will not be smooth. And using astronomy filters that don't match the passband of the Bayer matrix on a color camera is a good way to lose sensitivity.
The real solution is to switch to a monochrome astronomy camera, preferably with a filter wheel. They're more expensive, and it's tricky to find a suitable adapter to attach them to a camera lens, but the image quality is far superior. If your optics are not perfect, you might have to re-focus slightly every time you change filters. But there are big advantages. First, your background will no longer be chunky or grainy. The stars will be sharper and smaller. This isn't a subtle difference. Once you've used a 16-bit astronomy camera, you might realize all the pictures you acquired with a regular camera were actually terrible.
CCD vs CMOS: CCD cameras have a linear response to intensity, but CMOS cameras don't. If you ever plan to use a camera to measure anything (like, say, fluorescent signals from biological samples), you'd need to calibrate a CMOS camera or your results will be meaningless. It's getting harder to find CCD cameras these days; grab one while you still can.
Saturation is a big fat problem in astrophotography, especially on targets people think are easy, like the Orion Nebula. Saturation is caused by a low dynamic range, which is set by the bit resolution of the analog-to-digital converter (ADC) in your camera. Unfortunately, many vendors are now cutting corners, selling ‘astrophotography’ cameras with only 14 or even 12 bits of pixel depth. This would make them little better than an ordinary camera. When you encounter a faint object, you'll discover that it's impossible to work with the image. Brighten it and the highlights get saturated. Raise the gamma and you get banding.
They'll probably try to tell you that you don't really need 16 anymore, and it's true that if you have enough pixels you can synthesize 16 bits out of 12. By combining four pixels into one, you can theoretically increase your depth from 12 to 15, and the image is now four times smaller. As an added bonus, you also double your read noise. Don't waste your money.
If you're only interested in planets, you might not need a camera at all. Most people use a webcam or equivalent and Autostakkert to line up the frames.
Mistake #7: Getting whacked on the head by your telescope
Okay, so now you have an equatorial mount. You figured out that your alt-az simply doesn't work at your best viewing angle, which is straight up. You've picked a solid location on solid ground, never on a deck, and certainly not in a windswept “astronomy tower” like in the movies: even if your deck seems solid, vibrations will be amplified a thousand fold. Whenever you move, the floor will sag slightly, knocking the object out of your viewfinder.

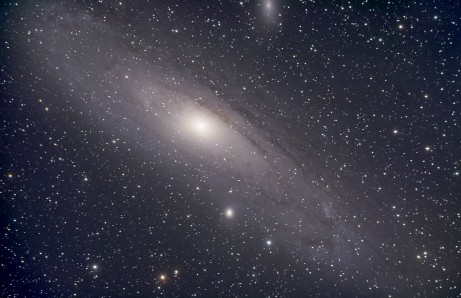
M31 Andromeda galaxy upside-down. That just doesn't look right
If your goal is to understand the sky, you've now bought a star map. The best one is the two-volume Uranometria, which is useful for advanced users, but a beginner is better off with something smaller like The Cambridge Star Atlas or SkyAtlas 2000.0 by Wil Tirion and Roger W. Sinnott. Most beginners buy a little illustrated book like Stars and Planets by Ridpath & Tirion that helps them confirm what they were looking at. Maybe you even have a guide scope, which contains a little computer that sends corrections to your mount. You have your battery-operated hair dryer to blow the condensation off your lens and keep you looking fashionable. And you have a bottle of Extra-Strength Tylenol for the terrible headaches you get after staying up until four in the morning in the howling wind.
Do yourself a favor and practice setting up your equipment and focusing it during the daytime. If you try to attach your scope to a mount in the dark, it's guaranteed to slip out and whack you in the head. Or it could track the sky for four hours, then get snagged on a loose cable at 3:00 am, pulling your laptop into the snow and ruining all your exposures. Or Windows on your PC may decide you haven't clicked on anything in a while, so now's maybe a good time to install updates and reboot. Or there could be stray dogs, cats, or raccoons. Keep the area neat so all these things can't happen.
Mistake #8: Getting Andromeda upside-down
You might think the orientation doesn't matter because in space there is no up or down, but it looks just as weird seeing M31 upside down as seeing the Sun that way. If your image is going to be useful to anybody, it's best to follow tradition and keep north at the top. If you can't, make a note of where you were pointing on the image. Don't rotate it on the computer—that will cause you to lose resolution.
In fact, it's a good idea to keep a notebook and record the settings, direction, and equipment configuration on every image. That way, if something ever comes out good, you'll be able to repeat it.
aug 20 2024, 4:48 am. last updated sep 30 2024
