Mounting big lenses for astrophotography

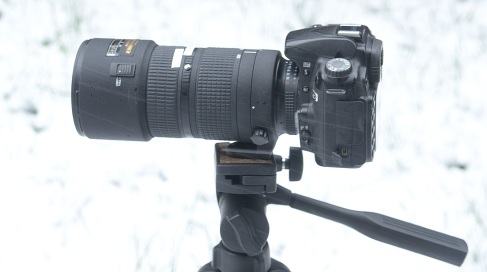
Fig. 1. For large lenses the tripod attaches to the lens instead of the camera.
 n this article I will discuss the basics of how to attach things together
when doing astrophotography without a telescope. See
here for
details about techniques and equipment.
Most photographers are familiar with standard quick-release camera mounts: a captive screw inside a small mounting plate screws into the threaded hole in the bottom of your camera. The mounting plate then clamps to the tripod by a small spring-loaded dovetail clamp. This makes it easy to put a different camera on your tripod quickly.
Most people buy a bunch of these mounting plates when they get a tripod because they're fragile and because they're different for every manufacturer. It's much easier to have one plate for each camera and lens and leave it attached. They also work for cooled CCD cameras and portable sound recorders.

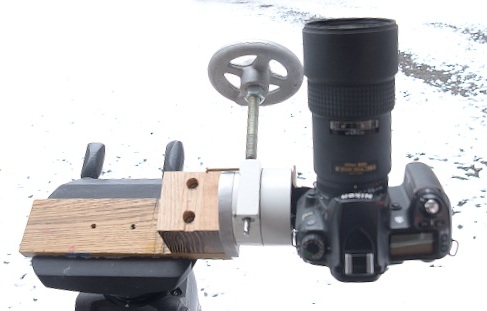
Fig. 2. Scrap wood and rotary table for attaching a camera and lens to a telescope mount.
With a big lens, this puts too much stress on the camera, so the mounting plate attaches to a rotating ring on the lens instead of the camera.
Small telescopes generally use the same principle, except that everything is bigger. As with camera mounts, telescope mounts from different manufacturers are often incompatible with each other, but with a little ingenuity and the magic of electric power tools this is not a major obstacle.
Since I usually end up with a variety of incompatible pieces I've found it's a lot cheaper to make them myself. One trick is to simply screw an L-bracket to a piece of scrap wood. Underneath the camera in the photo at right is a big 1/8" steel angle and a 1/4-20 screw with a knob attached (McMaster-Carr 63625K31)(Fig. 2).
It looks better in the dark, but it works.
I happened to have a small worm gear rotary stage from an earlier project, so I included that. It's convenient when framing a picture with earthly objects, because it helps keep them horizontal, but it's not really essential.
Thorlabs and Edmund Optics have lots of rotary stages, and rotary tables are common items in places that sell parts for milling machines and drill presses, though these are made of steel instead of anodized aluminum, so they're a lot heavier. Rotary tables use special T-slot nuts instead of threaded holes for attachment. In both types the worm gears are designed to minimize backlash.
Tripod Heads

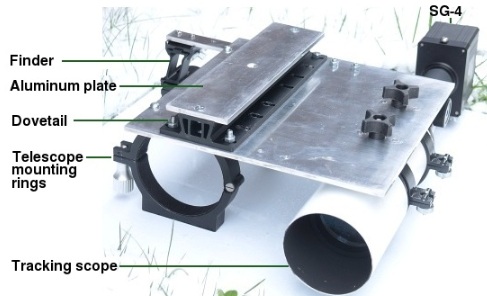
Fig. 3. Bottom view of dovetail assembly for a 5-inch telescope.
The type of tripod head to use is a matter of personal preference. Ball heads and push-to-point pan/tilt heads all work. For more precision there are also geared pan/tilt heads like the Manfrotto 405 and 410.
The criteria are:
- It should be possible to point it straight up. That's why I don't like gimbal heads like the Wimberley WH-200. It's great for ordinary photography, but pointing the lens straight up would disrupt its balance.
- It should rotate freely without crashing into things or getting tangled up in wires as your subject moves across the sky.
- There are two different screw threads: ¼-20 and ⅜-16. Make sure you get the right size.
- It should support the weight of your setup and not move easily when bumped. Ideally you should be able to lock it in place.
Fig. 3 shows the bottom view of the setup that I use. Everything is mounted to a 12×12 inch ¼" aluminum plate. A 5-inch refractor (not shown) fits in the circular mounting rings on the left. The dovetail that came with the scope was too small for my mount, so I attached a rectangular aluminum plate to it. On the right, a small tracking scope (with an SBIG SG-4 automatic tracker permanently attached) is held in place with two more smaller mounting rings. Rings come in different sizes, and they're tight enough that the tracking scope along with its rings can be unscrewed and moved to a different setup.
For most camera lenses, rings aren't usually needed. I use an almost identical setup for my camera except the dovetail is near the center. The important thing when building this stuff is to make it rigid enough that there's no flex.
On the upper left is a red dot finder, which I consider essential for astrophotography, regardless of what lens or scope you're using. You align the finder with the camera during the daytime. At night you use the red dot finder instead of the camera viewfinder to center the thing you're looking at. For a big telescope (≥8") this isn't accurate enough and you need a finder scope.
Notice that the dovetail is way off center. That's because the refractor is much heavier than the little tracking scope. The same principle holds for a camera with a heavy lens. The center of the dovetail has to be at the center of gravity.
Counterweights

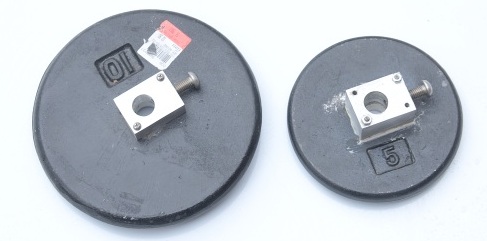
Fig. 4. Small counterweights
When you buy a telescope mount, counterweights come standard. Balancing your setup removes stress on the gears, making the tracking more accurate. But counterweights can also be useful for camera + lens astrophotography. Balancing everything keeps your equipment from crashing to the ground—or against your head—if something comes loose in the dark.
Even with a 400 mm lens, the 30-pound counterweights that come with a telescope mount will probably be too heavy. I made a 10 and 5 pound counterweight by attaching a piece of aluminum to an ordinary barbell weight from a sporting goods store (Fig. 4). Cast iron is harder than steel, but not so hard as to require a carbide drill bit. Use a high strength cobalt bit to drill through the cast iron, and just drill slowly. I also tapped a hole into the aluminum and used a big stainless steel screw to hold it on the mount.
Everything needs to be stainless steel and aluminum to avoid rust.
