Astrophotography Without a Telescope
 hy would anyone want to do astrophotography with a regular camera lens instead
of a telescope? There are many reasons. Some objects, like the Milky Way and
the Veil Nebula, are too big for the field of view of most telescopes. A regular
lens gives you the flexibility to set up quickly, without the hassle and
expense of a heavy telescope, wires, large batteries, and (for some cameras)
a laptop computer, Windows, device drivers, and software. Wide-field images
of the Milky Way or the stars can also be very beautiful. And sometimes you
can take more interesting pictures with a regular lens than are possible with
a big telescope, such as a picture of a flock of geese flying in front of the
Moon, the optical distortion caused by a jet exhaust, or the Moon rising over
a mountain in Yosemite National Park.
The criteria for a good lens for photographing stars and photographing during daylight are quite different. In this article I will discuss some of the technical and photographic aspects of selecting and using a camera lens for astrophotography.
Lens criteria for telescope-free astrophotography
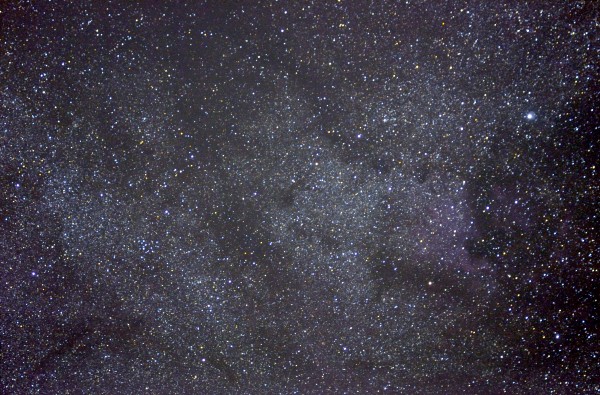
Image of a portion of the Milky Way in the constellation of Cygnus. This image was made without a telescope—only an 80–200mm f/2.8D zoom lens (set at 100 mm) on an ordinary tripod, using an unmodified Nikon D7000. A total of 28 5-second exposures, taken in Raw mode at ISO 3200, were combined in software to reduce the amount of noise. This image was also re-sized and contrast-adjusted. The reddish area in the center-right is the North America Nebula. Compare this image with the one under Nebulae.
For cameras, there is no dispute that a DSLR camera is as low as you can realistically go if you want to take good quality pictures at night (although there are some people who still use film cameras, and get good results). But there's a great deal of confusion about lenses. Some camera review websites ridicule the idea of obsessing over lens size. They advise you to just move closer to the subject. That's great advice if you're taking pictures of your dog, which might be three feet away, but when the subject is 1,800,000 light years away, it's not really an option. (However, if you have a few billion bucks of taxpayer money lying around, as NASA does, it's still very good advice.)
Astrophotography is a science. The golden rule in science is: always make the raw data as good as you can get it. To do astrophotography well, you're better off spending money on good lenses than buying a cheap one and trying to fix the image in Photoshop. Photoshopping your images will only make them look unnatural. For example, one mistake people often make with Photoshop is to make the background black, thereby removing all the faint detail from the image. Experienced astrophotographers can spot this instantly and would diss your image.
That said, it's possible to get great results with lenses costing around a hundred bucks. The biggest factor in widefield astrophotography is not the lens, but the amount of light pollution at your site. The worse the light pollution, the harder it is to subtract it out.
Distortion
Before I start, let me dispel a few myths. Using a camera lens instead of a telescope will not necessarily make your task easier. You will have much more trouble with light pollution with a regular lens than with a telescope. You will also have the additional task of making your photograph into an interesting composition. That's not usually an option with a telescope. Although many people are attracted to camera lens astrophotography because they think it's cheaper, this is not necessarily so. You can easily spend one or two thousand dollars for a good camera lens. For that amount of money, you could get a very good telescope and a computerized mount.
 Coma distortion at the edge of a 35-mm f/1.8 lens at different
apertures. This is considered to be an excellent lens, but for
star fields it's only usable when stopped down four steps. A
slower lens, such as an f/2.8, would have to be stopped down
four more steps, which means you're already down to f/4.5.
(D7000, 10 sec, ISO 1600, daylight white balance, re-sized)
On the other hand, with a camera lens there's less of a need to be familiar with the sky. You just point in the general direction of "up" and take your picture. And if you get bored with it, you can use the lenses for other things, like throwing them at your dog when it barks too much because you're not taking any pictures of it. So it's a good way for beginners to get started.
The three factors that are most important in photographing stars are chromatic aberration (CA), speed, and sharpness.
-
Chromatic aberration Even some lenses labeled ED, which have
some elements made of extra-low dispersion glass, have unacceptable CA.
For a landscape photo, CA isn't too important. For stars, what you'll get
is 2 or 3 separate stars in the corners - a red, white and blue star next
to each other. Yes, you can sometimes fix this in software, but it's a
pain. Don't waste your time with a non-ED lens.
-
Speed You need a fast lens. Period. f/1.4 to f/2.8. It should be a
good enough lens that you can use it wide open, or almost wide open. That's
because, in order to get good images, you'll have to stop it down, which
means longer exposure times. And long exposure times mean star trailing.
The only way to avoid that is to put your cash into a motorized mount instead
of the lens. That costs money. So a slower lens is not really cheaper.
- Sharpness Ken Rockwell has a wonderful rant about people who are obsessed with sharpness, making it sound like they're total dorks. But if you photograph the stars, or the moon, sharpness is critical. Do not buy a lens that is not sharp edge-to-edge. Embrace your inner dork. Wear the label "dork" with pride. And don't forget to buy some adhesive tape for your glasses!
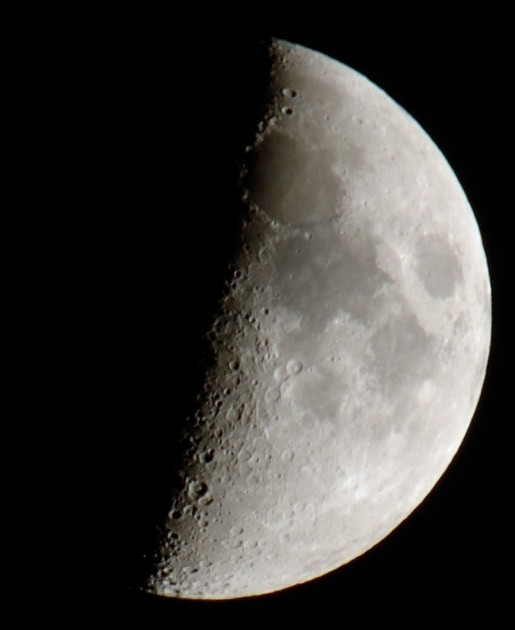
Un-resized photo of the Moon taken with a Nikkor VR 18–300mm f/3.5–5.6G zoom lens (D7000, 1/100s, f/8, focal length 300 mm, focus mode manual, ISO 100, cropped, slight sharpening applied). A better lens would avoid the chromatic aberration visible here and give a sharper result.
The dispute about sharpness is probably a holdover from the old days when people used to print hard copies of their photos. Even so, it has a point: because of the optical low-pass filter in almost all DSLR cameras (the D800E and D7100 being the only exceptions that I know of), your images will always be slightly fuzzy when viewed full-size, even when they're taken with a multi-thousand-dollar lens. To get an artifact-free, sharp image, it's usually necessary to reduce it to about half its original size. I use the “bin pixels - average” function in Imal for this, because this feature also reduces the image noise, but it can also be done in Photoshop.
An articulating screen is a big convenience. I used to use a portable TV, but they tend to suck up battery power.
Some other features are important for daytime photography, but less so for astrophotography:
-
Vibration Reduction A tripod or mount and a remote shutter
release are essential for any kind of astrophotography. Vibration reduction
doesn't help. Leave VR turned off if your lens has it. Most of my lenses
don't even have it—but then, I learned photography with an old manual
film camera and subsequently migrated to a Coolpix 880,
which was so slow it forced me to learn the tricks of holding a camera
steady (like, for instance, gluing it to a rock).
-
Auto-focus Everything we're talking about here is at “infinity.”
The stars are too dim for autofocus to work, so you need to focus manually.
On many cameras, autofocus doesn't work when photographing the moon, either.
To focus a DSLR, set the exposure compensation as high as it will go, set
the focus ring to infinity, point
at a bright star, use Live View / digital zoom to focus, and then lock the
focus if possible. Older DSLRs weren't sensitive enough for this to work,
except with a few bright stars, and it was often a nightmare focusing
them, especially when using a zoom lens. But with the most recent batch
of digital cameras, like Nikon's D7000, it has become easy. You kids
have it easy.
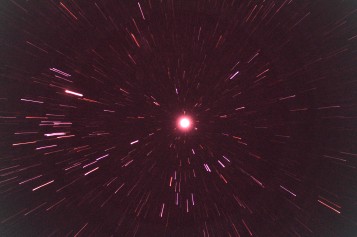
Lens creep distortion in infrared image of the planet Jupiter taken with a zoom lens and no duct tape. Settings: Modified D90, R72 filter, Nikkor 80–200 f/2.8D, f/3.2, starting focal length 86 mm, 9 sec, ISO 1600.
-
Distortion - There are many types of distortion. Pincushion
and barrel distortion are not much of a problem. But coma is a disaster
in astrophotography. Pay close attention to lens reviews when people
mention “contrast.” If a lens has lots of coma, reviewers will
sometimes say it lacks contrast. That's because they don't understand
what's happening. Coma changes point sources (like stars) to seagull
patterns, especially around the edges. On a daytime photo, it seems
as if you're losing contrast. But in fact, a lot of what's happening
is optical distortion (see image above), mostly spherical aberration
and coma.
Geometric distortion can create big headaches when you try to combine multiple frames. If distortion is present, some parts of the combined image will not be lined up, causing the image to appear out of focus. This could happen if the lens is off-center or tilted, or if there are imperfections in your filter, lens, or camera sensor.
- Zoom lenses Zoom lenses tend to zoom by themselves when pointed straight up. This is called lens creep (see photo above). Typically, the lens zooms very slowly, at a continuous rate. This can easily be confused with bad tracking, because it turns stars into long streaks. So duct tape is essential. Zoom lenses also are hard to set exactly the same each time. This can make it a challenge to combine shots taken on different days. Zoom lenses can also be heavy, which can make it difficult to balance them on a small mount.
Lenses
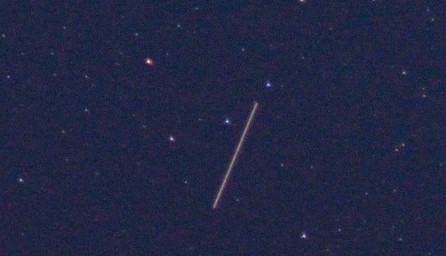
Satellite trail photographed with Nikkor 50mm f/1.2 lens (D7000, 2 sec, f/2, ISO 4000, cropped, resized to 50% width). This is a crop from a corner of the image, yet the lens is so good that no CA and very little coma are visible. Satellite trails are generally fainter than airplane trails, except for big satellites like the ISS. With experience, it is easy to tell the difference.
So, what is the best lens to use? As with daytime photography, that depends on what you want to photograph. Select your lens on the basis of how big your object is. A free Windows program (ccdcalc) can show you how some popular astronomical objects fit in the field of view for various telescopes and lenses.
-
Large objects Milky Way, constellations, star trails, meteors—use
a short lens.
-
Medium-size objects
For medium-sized objects, like the Moon, you need a long lens. An 8-inch
aperture f/10 scope and a DSLR at prime focus will fill the entire frame
with the Moon almost exactly. You can't compete with that, even with a top
telephoto lens, but you can fit more earthly objects into the frame. This
can make your picture more interesting. Adding a second object, like a
church steeple, a telephone pole, or your dog, can give the picture
more atmosphere and artistic appeal.
Nebulas are good subjects for telescope-free astrophotography, because some of them have angular sizes many times bigger than the Moon. The only problem is that most nebulas emit their light at 656 nanometers, which is almost completely blocked by the camera's internal filter. To capture that beautiful deep red glow of recombining hydrogen atoms, you have to have your camera modified for infrared. But some nebulas, like the Swan Nebula and the Orion Nebula, are bright enough that you can nail them even with an unmodified camera.
Some star clusters, such as the Pleiades and Hyades, are also big enough that a telephoto lens will work satisfactorily. But the result won't be as good as if you used a telescope, because a small lens will miss some of the finer details.
-
Small objects
For galaxies or small star clusters, you need a big telephoto lens to see
anything other than a fuzzy dot. You're better off leaving these objects
to the guys with big telescopes. The only exceptions are Andromeda and the
Large Magellanic Cloud, both of which are much bigger in angular size than
the Moon.
Planets are also very small. Photographing planets is a specialized science, and is usually done using a telescope and a special high-speed camera similar to a Webcam.
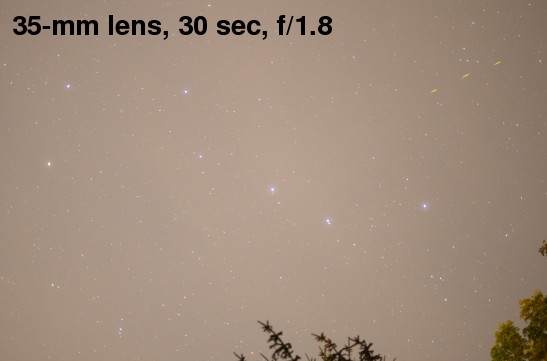
A 30-sec exposure of Ursa Major taken with a 35-mm f/1.8 lens on a Nikon D7000 at ISO 1600. Even though the sky looked completely dark to the eye, it appears light brown in this photo because of light pollution. (However, night photographs taken with a D7000 tend to appear a bit more brown than with other cameras.) Correcting this in software would be possible on this image, because there's lots of signal to work with. This particular image was photobombed by a firefly, which is visible as three yellow streaks in the upper right.
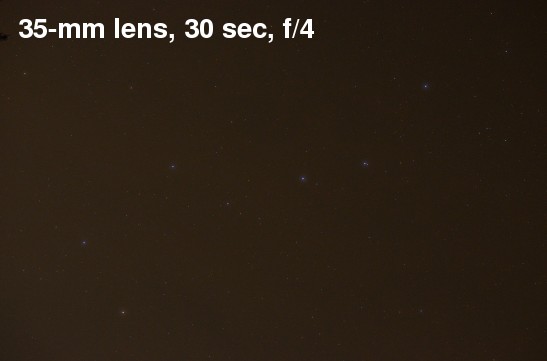
The same lens stopped down to f/4.0. This image would be harder to fix because the signal is fainter, but the camera noise is the same. You would have to take several images and combine them on the computer (using Deep Sky Stacker or some commercial software like Nebulosity) to get a noise-free image. These three images in this panel have been resized and converted from 48 to 24 bits/pixel, but not otherwise altered.
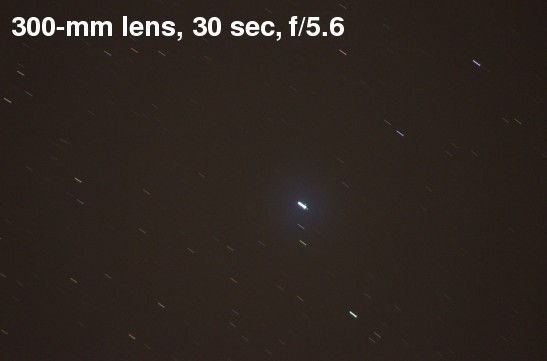
With a 70–300mm zoom lens set at 300 mm, the stars are a little brighter than the 35mm lens because of the larger aperture. However, star trailing now becomes a problem. Also, f/4.5 is as far open as this lens will get. At 300mm, it's only f/5.6. Although it's not visible here, the stars in the corners are highly distorted. In real life, you'd probably have to stop this lens down to f/8 to get acceptable star shapes.
Camera lenses are measured by their focal length in millimeters. Telescopes
are measured by the diameter of their primary lens or primary mirror in
millimeters. To convert, use these formulas:
focal length mm / aperture mm = f-number.
focal length mm / f-number = aperture mm .
The number of photons collected, which determines maximum brightness, is proportional to aperture squared. Speed, that is, the ability to focus a lot of light efficiently onto a single pixel element, is inversely related to the f-number. Magnification is proportional to focal length. Resolution is determined by many factors, including the turbulence in the atmosphere and the aperture of the lens.
I am most familiar with Nikon lenses, since I've used a bunch of them, but Canon lenses are just as good. Nikons can be used on a Canon, if you add a special adapter, but Canon lenses will not work on a Nikon. Here is my brief review of some Nikon lenses for telescope-free astrophotography.
-
Nikkor 28–300mm f/3.5–5.6 (FX)(Aperture = 8–53.6 mm).
Some people complain that the focus ring on this one is too small.
At higher zoom it goes down to f/5.6, which means it's fairly slow.
This is a great travel lens, but it's not ideal for astrophotography.
The difference between f/3.5 and f/1.8 is night and day—literally
(see photos at right).
-
Nikkor 18–300mm f/3.5–5.6 (DX).
This new super-zoom lens is great for daytime use, but probably too
slow for astrophotography. However, at 200mm, the sharpness is almost
indistinguishable from the 80–200. The only difference is that this
lens shows some chromatic aberration (see photo of Moon above).
-
Nikkor 80–200mm f/2.8 (FX)(Aperture 28–71 mm). This lens has no VR
but it maintains f/2.8 throughout its zoom range. And it is sharp!
(See photo of Cygnus at top of page).
-
Nikkor f/1.8 35mm (DX) (Aperture 19 mm) The best lenses are primes,
because you can get them in low f-numbers, and they are often sharper.
This one can be used as low as f/2.2. In my area, the light pollution
turns the sky completely white with this lens in a two-minute exposure.
A 35-mm lens on a DX camera is wide enough to photograph an entire
constellation (see photo at right). It's a nice lens, but it doesn't
have an aperture ring, and it's not quite sharp enough, so it's not
recommended for astrophotography. See below for why an aperture ring
is important.
-
Nikkor f/1.2 50mm (FX) (Aperture 41.6 mm) Even though this lens has no
autofocus or vibration reduction, it's my favorite lens for astrophotography
because it's fast and amazingly sharp at f/2, even in the corners (see photo
above). It won't focus past infinity, so your camera has to be in good
shape in order to use it. The focus limitation also limits its use for UV
photography, and if you use filters you have to re-focus it for each wavelength.
But despite these limitations, it's great.
-
Nikkor f/2.8 60mm (FX) (Aperture 22mm) A prime macro lens that comes
with the D90. A little slow for astrophotography, but usable, and sharp
despite not being ED.
-
Nikkor 70–300 f/4.5–5.6 (FX) (Aperture 15–54 mm) There are two versions
of these. The cheap one has lots and lots of CA. The more expensive
one is better, but still too slow.
-
Nikkor 70–200 f/2.8 (FX) (Aperture 25–71 mm) Another excellent, very
sharp lens. So sharp it will cut a big hole in your bank account and
allow all your money to trickle out.
-
Nikkor 180 f/2.8 (FX) (Aperture mm) A great manual fixed telephoto lens.
Sharp edge-to-edge even at f/2.8. On a camera, the field of view is big
enough to fit both halves of the Veil nebula in a single frame (see image
at bottom of page).
-
400mm and above For this range, it's usually better to switch
to a telescope. These big telephotos are heavy and are just as expensive
as a high-end refractor scope. Remember, you can buy a perfectly good 80-mm
f/5.0 refractor (focal length = 400 mm) for about 100 bucks. The Orion ShortTube
rich-field refractor, for instance, weighs 2.95 pounds and is 15 inches long.
Compare that to
a Nikkor f/2.8 400mm lens, which has the same focal length but costs over
7,000 bucks and weighs three times as much. You do get a lot more aperture
(142 mm) and presumably less coma (although I haven't tested that). But
for that price, you could get an Astro-Physics 130mm f/6.3 refractor, a
focal reducer, and a couple of eyepieces and make all the amateur
astronomers really hate your guts.
On the other hand, if you have one already, they're great.
Aperture rings Some lenses don't have an aperture ring, so the aperture can only be set in the camera. These kinds of lenses are fine with a DSLR, but they don't work on CCD astronomy cameras, because most of them don't have any way of setting the aperture. If you ever upgrade to an astronomy camera, you'll have to jam a piece of plastic into the lens aperture lever to keep it from closing down to f/22. These lenses should be avoided if you ever plan to move to a cooled CCD camera.
Because FX lens format is bigger, lenses designed for FX are bigger and tend to gather more light, so they're generally preferable to DX lenses even on a DX camera. Bigger diameter = more resolution and shorter exposures.
Optical Aberrations: Problems and Solutions
| Problem | Characteristic Symptom | Solution |
|---|---|---|
| Spherical aberration | Halos around bright objects, can't get sharp focus | Stop down the lens |
| Chromatic aberration | Purple fringes, colors not lined up | Use an ED lens |
| Coma | Seagulls in corners | Stop down the lens |
| Diffraction | Fuzzy image at f/16 or higher | Open up the lens |
| Out of focus | Stars are uniform round disks, not points | Use Live View to focus |
| Images getting darker over time | Dew condensation on lens | Battery-operated hair dryer |
| Color noise | Colored splotches in image | Use lower ISO and longer exposure |
| Chromatic focal shift | Red halos around stars | Use a filter or get a better lens |
| Barrel or pincushion distortion | Straight objects appear curved | Use a different focal length |
| Field curvature | Out of focus in corners | Use a better lens or field flattener |
| Astigmatism (rare) | Asymmetrical stars | Lens elements may be misaligned |
| Tilt | Out of focus on one side of image | Lens is mounted crooked, re-attach |
| Bad tracking | Stars are short dashes instead of dots | See below |
| Insufficient resolution | Stars are big blobs instead of points | Use a bigger aperture lens |
| Lens flare | Large white circles on image | Stop doing remakes of Star Trek |
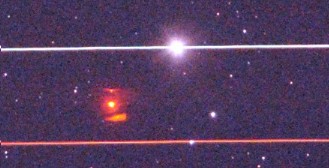
Airplane trails appear as two parallel strings of beads due to the 1-second wing strobe. The red center beacon strobe looks like a fuzzy star, but in this telescope image you can see reflections from parts of the fuselage. Color noise is also visible in the background.
Another common artifact is large red “stars” that appear in some images and not in others. These are red strobes from airplanes, which flash at one-second intervals. They may be surrounded by a halo caused by reflections off the fuselage. Long time-exposures of the night sky commonly show many trails of red and white flashes going in many directions. If the plane has its landing lights on, you may see four or more solid lines.
Red halos around stars are very common. They're caused when the lens focuses red, green and blue to different points. Many camera lenses do this. That's one reason monochrome CCD cameras give sharper images than color cameras: with a monochrome camera you expose one color at a time, and refocus every time you change filters.
Long white streaks may be airplanes or satellites. Some satellites, especially Iridium satellites, show up as a brief flare that resembles a meteor trail. Or they may periodically get brighter and dimmer if the satellite is tumbling out of control.
Star sizes and Airy disks

Orion Nebula photographed with a Nikkor 18–300mm lens (left) and a 4.3-inch refractor scope (right). The image on the right has been shrunk to make the star fields the same size. Even with a three-second exposure, the stars in the left image are not round, and they are larger and fewer in number than the telescope image. Of course, the fact that a tree branch got in the way of the camera doesn't help, either. However, the camera image covered a much wider field of view. Also, the telescope image had to be exposed for 39 times longer to get comparable brightness, because the same photons were spread out over a much wider area on the sensor.
Settings: Left = D7000 on fixed tripod, Nikkor 80–200 f/2.8D at 200 mm, f/3.2, ISO 1600, 49 frames of 3 sec stacked; resized to 1/16 original area, cropped, sharpened and contrast-stretched. Right = modified D90 on WO FLT-110 + 0.8x reducer/flattener, f/5.6, CGEM, no guiding, total exposure 96 min, resized to 1/159x original area.
Optically, stars are point sources. However, because of the wave nature of light, an image of a star always appears as a disk, known as an Airy disk, which has a finite size. Several factors determine the size of a star image on your sensor:
-
Seeing At high magnification, stars are not found at fixed positions, but
move around randomly, due to atmospheric turbulence. This is called seeing
and it is measured in the number of arcseconds that the star moves, 2–4 arcsec
being typical.
-
Aperture The laws of optics say that the diameter of the Airy disk is
independent of aperture. However, when you have a wide field of view, there
are many more stars on the sensor. When the image is enlarged to the same
scale, the size of a star taken with a small diameter lens becomes proportionately
much bigger than the size of a star taken with a large lens. This is a roundabout
way of saying that a small diameter lens has less resolution than a large one.
So a telescope will always produce proportionately smaller stars (which is good),
but it will also have a narrower field of view (see image of Orion Nebula above).
One result of this is that it's harder to photograph nebulas with a small lens than a big one because the stars, being proportionally bigger in a small lens, block more of the view.
- Focal length the longer the focal length (and therefore magnification), the further apart the photons are spread on your sensor. So, ceteris paribus, it takes proportionately longer to get the same level of exposure as with a short focal length lens. However, the total amount of energy that's captured depends almost entirely on the aperture. You can compensate for the long exposure by binning the image, which restores the original concentration of energy. But binning trades resolution for speed. If you bin the image 2×2, it's four times brighter, but your image is four times smaller, and you still have the same narrow field of view.
The Cambridge Photographic Star Atlas is a good example of the trade-offs of doing astrophotography without a telescope. Mellinger and Stoyan used a high-end SBIG 16-bit camera and Minolta 50mm f/1.4 lens, stopped down to f/4, and no telescope, to photograph the stars as seen from both the Northern and Southern hemispheres. The resulting images are spectacular for star fields, but mediocre for nebulae and terrible for galaxies. Photographing small objects such as galaxies and planets is a challenge with a regular lens, because of its lower resolution. The result is typically a saturated white oblong blob with little or no detail. Even Andromeda and the Large Magellanic Cloud, which have a large apparent angular size, can be difficult with a small lens.
Mounts
Using an ordinary tripod, how long can you expose before star trailing becomes a problem? Trailing is influenced by four factors:
- Time The longer you expose, the more trailing you will get.
- Aperture The more light you can get onto your sensor, the shorter your exposure can be.
- Magnification With a 35-mm lens and a camera with a DX or APS-C sensor, star trailing becomes objectionable after about 20 seconds. With a 200-mm lens on the same camera, stars begin to change into streaks after only 5 seconds.
- Declination The amount of trailing per unit time depends on the cosine of the angle from the celestial equator. In plain language, that means if you point directly at the north or south pole, there will be no trailing, and you will get the most trailing for objects on the equator. For example, with a 200mm lens you can expose stars in Ursa Major for up to 5 seconds, but the longest you can expose the Orion Nebula without trailing is about 2 seconds.
There are several ways to deal with this:
-
Motorized mount Inexpensive motorized mounts made specifically for this
purpose are available. As your magnification approaches that of a telescope, getting
more precise movement and aligning the mount with the Earth's axis become more and more
important. If you're in the northern hemisphere, aligning it is done by pointing the axis
of rotation of the mount toward Polaris. The more expensive German equatorial mounts
used by amateur astronomers will also work, but they aren't needed at these levels of
magnification, unless you want very long time exposures. Some people use a homemade
device known as a “barn-door mount.”
Motorized telescope mounts gradually become more inaccurate over time, and eventually need to be rebuilt or replaced. Most people get fed up with doing this and buy an autoguider, which is a separate camera or section of a chip that locks on to a star and corrects the tracking of the mount by sending correction signals back to the mount. If you buy a telescope mount, make sure it can accept an autoguider input. - Manual tracking If your tripod permits it, you can also rotate the camera manually, using a separate monocular with a reticle to keep the object centered. Probably the least fun option, but it's how they did it in the old days.
- Stacking Take many short exposures and stack them using a free software package like Deep Sky Stacker. This works well, but it's a little inconvenient, because you might have to stack hundreds of frames. Stacking increases the signal and reduces the noise, and can produce excellent images. The trick is to expose long enough that your signal is safely above the noise level of the camera, but not so long that the stars turn into streaks.
- Increase the ISO This option increases the noise in your image, generally producing unsatisfactory results. However, if you have a high-end camera like a Nikon D4, it may still be a good option.
- Use a faster lens Good option but expensive.
- Fix it in the computer Small amounts of trailing can be removed by deconvoluting the image. This is the worst option of all, because it not only increases the noise, it can create bad artifacts in the image.
- Only take pictures of Polaris This works well, but gets boring after awhile.
- Make the image really small If you shrink the image enough, they won't notice the fact that your stars are actually short dashes.
- Give up Star trails are cool, too.
As mentioned above, trailing can also be caused by zoom lenses zooming by themselves.
Nebulae (Added Sep 24, 2013)
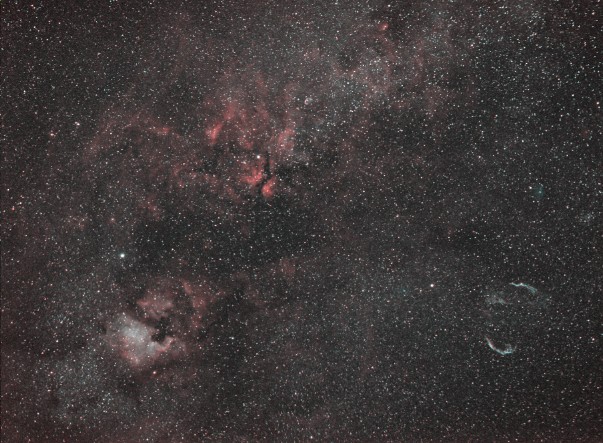
Image of a portion of the Milky Way in the constellation of Cygnus using filters. This image was made without a telescope, using a Nikon D90 modified for infrared, and a CGEM motorized mount. The red channel is a single 10-minute exposure with a Baader 7 nm H-alpha filter. The green and blue channels are a single 10-minute exposure with a Celestron 8-nm OIII filter. Lens: Nikkor f/1.2 50 mm, set at f/2.0, ISO 400, no guiding (Cropped and resized).
I mentioned above that nebulas are ideal subjects for astrophotography with a regular camera because they are so big. But what exactly do you need to take good pictures of a nebula? Here's a shopping list:
- A motorized mount is essential, because you will be exposing for 5 minutes to an hour.
- At least one two-inch diameter narrow-band filter. Hydrogen-alpha (Hα) filters and Oxygen-III (OIII) filters are good to start. (Watch out: some filters marked as Hα are really long-pass filters and will give terrible results.)
- A 52–48 mm step-down ring, plus a set of step-down rings if your lens is something other than 52 mm in diameter.
- A fast, sharp lens. If your lens isn't sharp, the stars will be so big that they will tend to cover up the nebula.
- A clear, dark sky.
- A camera modified for infrared. Some people modify their own camera, but there are many vendors who will do it for a fee. It's a simple modification, and the modified camera can usually still be used for regular photography. If you save the parts it's not difficult to convert it back.
- For DSLRs, the newest bunch of cameras are preferred because they're much more sensitive. Since you'll be using a narrow-band filter, Live View focusing won't work with the older cameras. You can still focus by trial and error, but a more sensitive camera, like Nikon's D7100 or the Canon equivalent, will make the task much easier.
Some nebulas are bright enough that you can dispense with some of the above items. For example, I've taken reasonably good pictures with a Hα narrowband filter of objects that were only a few degrees away from the full moon (dispensing with item no. 5). For a blue oxygen III filter, though, you need dark. A modified camera is only needed for Hα and SII, which are in the near-infrared. If you don't want to risk modifying your camera, you can still take great pictures of some nebulas with an unmodified camera, using an OIII filter, but they will appear blue. Unfortunately, not all nebulas emit blue radiation.
Non-emission nebulas, like the Witch Head Nebula, are not helped by using filters.
Photographic lenses are ideal for wide-angle shots like the photo of the nebulae in Cygnus shown above. This image combines the nebulas around the star Sadr, which is the center of the “cross” in Cygnus. The butterfly-shaped IC 1318 nebula in the center and the tiny C-shaped Crescent Nebula (NGC 6888) above and to its right appear red. The large white nebula at the lower left is the North America Nebula (NGC 7000). Just above it is the Pelican Nebula. The white parentheses-shaped one at lower right is the Veil Nebula (IC 1340). No telescope was used, but the camera was attached to a CGEM German equatorial mount.
Compare this image with the image at the top of the page, where the North America nebula is just a faint pink smudge superimposed on the Milky Way background. Without a filter, it is virtually impossible to photograph the Veil nebula with a camera lens. With a filter, you almost can't miss it.
The sharpness of the lens makes a huge difference in pictures like this, because the stars are point sources. Don't listen to people who tell you a sharp lens is not necessary. I tried the same nebula on the same night with a f/1.8 35-mm lens, focused to perfection, and instead of sharp points, the stars came out as big fuzzy blobs. So I switched to a manual f/1.2 50-mm lens. The trade-off with this particular lens is that near-infrared and blue don't focus to exactly the same point, so it's necessary to re-focus when switching filters.
More advanced techniques
Some objects are so large that it's virtually impossible to photograph them with a telescope. That's where the power of telescope-free astronomy comes in. Most people are probably familiar with the gigantic Orion Nebula (see photo above), but they might not realize that it's surrounded by an even larger nebula called Barnard's Loop (Sh2-276), which is over 12 times bigger, both in actual size and apparent size, with an angular size of almost 840 minutes of arc. That's 28 times bigger than the angular size of the Moon. Barnard's Loop covers nearly 15% of the distance from the celestial equator to the pole. Yet despite its size, it is far too faint to be seen with the naked eye, or even through the eyepiece of a typical telescope.
At this scale, the entire Orion Nebula, which is about twice the apparent size of the moon, is only a small white blob in the center, and the Horsehead Nebula is a tiny dark blip near Alnitak (the leftmost of the three large stars in Orion's belt). Photographing Barnard's Loop with a telescope would be like photographing the Empire State Building with a microscope. You could do it, and you'd certainly get better resolution and finer detail, but it would take weeks of exposing and painstakingly stitching images together. The image below took less than an hour to photograph, plus another ten or twenty minutes of computer processing time.
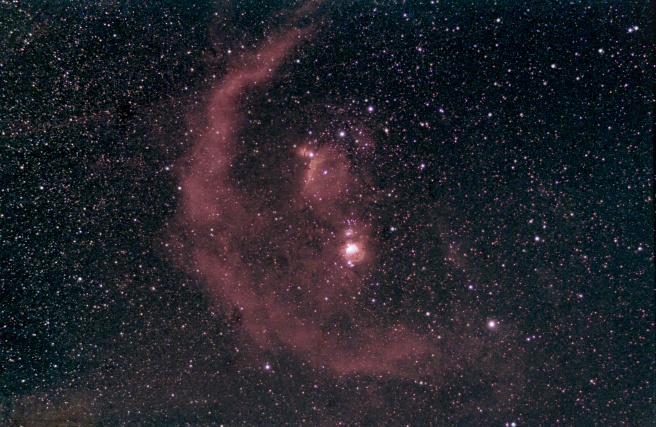
Barnard's Loop in Orion is 320 light years across and only 1300 light years away, so its angular size is 13.8 degrees. (Modified D90 and 50-mm f/1.2 lens.) Compare this image with the one below from a monochrome CCD camera.
Here's the equipment that was used for this image.
- A DSLR partially modified for infrared, set at ISO 800.
- CGEM motorized mount (aligned with Polaris using a polar scope).
- 2-inch H-alpha, 7 nm filter and a 52–48 mm step-down ring.
- Nikkor 50 mm f/1.2 lens set at f/2.0.
- A copy of Deep Sky Stacker.
- Image processing software (Imal or equivalent) to adjust the contrast.
To make this image, I took 11 exposures of 5 minutes each with the Hα filter and 8 color exposures of 15 seconds with no filter. At f/2, with moderate levels of light pollution, you can only expose for 10–15 seconds before the the sky background starts to saturate the image sensor. If your lens is slower, you will need proportionately longer exposures. Because Barnard's loop is so faint, the H-alpha filter is essential for blocking out the starlight. Almost nothing is visible through an O III filter; hydrogen is by far the strongest signal, so you need a camera that can photograph the near-infrared wavelength of hydrogen. That means either a modified DSLR or a specialized CCD astronomy camera.
In Deep Sky Stacker, make sure to load the color images first, or the software may get confused and make the image completely red. The rule of thumb is: one second without a filter is equivalent to one minute with a filter.
Cooled astronomy cameras
Compare this image with the one below taken using a cooled astronomy camera (total exposure 40 min). CCD cameras are more sensitive and have higher resolution than a DSLR. Images are smoother because of the greater pixel depth, but the cameras are harder to use. Generally they're controlled by a laptop computer through a USB, ethernet, or serial cable.
You can get comparable images with a DSLR, but it takes a lot longer. See linuxsetup137.html for details on setting up a CCD camera. What an astronomy camera buys you is more efficient use of your limited observing time.
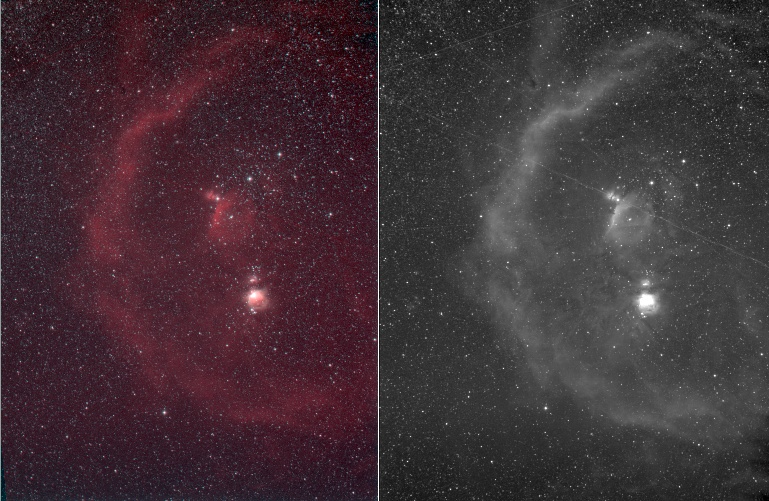
Barnard's Loop photographed with the same Nikkor f/1.2 lens, but using a cooled astronomy camera instead of a DSLR. Left: Red=Hα, green=luminance and blue=blue. Right=Halpha only. These images were taken on a night when lots of airplanes were flying around, so they are crisscrossed with airplane trails. Nebulae are often shown in grayscale to make it easier to see the detail. Technically this was a cooled CCD camera, but in this instance additional cooling was not actually necessary. It was so cold that when I set the camera to −15C, instead of cooling down, the heater came on.

Cropped, unresized image of Crescent Nebula (NGC 6888) taken with a Nikkor 50mm f/1.2 lens without a telescope using a cooled CCD camera and filters. Red=Hα, Green and Blue = OIII. Notice how the nebula is partially obscured by the stars. A telescope image would show more detail and the stars would be smaller, while a DSLR image would be fuzzier and many of the fainter stars would be lost in the noise. (Contrast-stretched and cropped to 1.46% of original area. CGEM motorized mount; total exposure 90 min.)
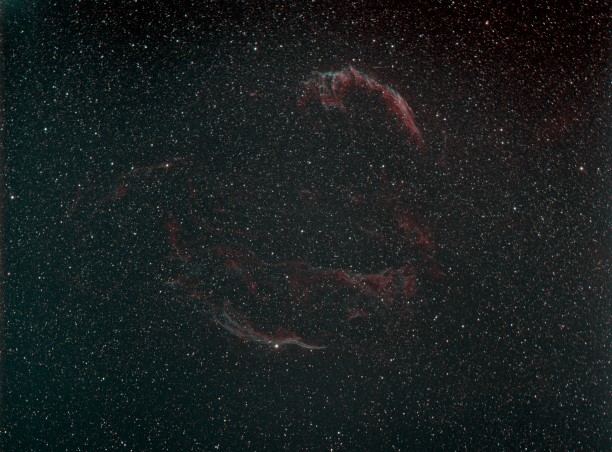
Veil nebula photographed with a 180 mm f/2.8 telephoto camera lens. Because the Veil Nebula is so big, most telescopes can only capture part of it at a time, but it's a perfect match for this lens. I used a cooled monochrome CCD camera for this image. That allows you to re-focus after changing filters, which is necessary with most camera lenses. The limiting factor here was the blue-green background from the Moon, which was out while the picture was taken. I subtracted that from the image. Even so, it only took 20 minutes with each filter to get this image. (Red = H-alpha filter; Green and blue = OIII filter. Not cropped, but contrast-stretched and resized. CGEM motorized mount, no guiding; total exposure was 20 min H-alpha and 20 min O-III.)
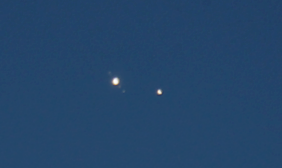 Jupiter and Saturn conjunction photographed without a telescope. Three of
Jupiter's moons are visible around Jupiter (at left). (D7000, ISO 500,
300 mm lens, f/11, five frames of 1 sec stacked
manually, cropped and sharpened)
Update (Mar 31, 2015) Nikon has a new DSLR designed for astrophotography called the D810A. It's a 36.3 MP CMOS camera sensitive to wavelengths out to 656 nm that does long exposures up to 15 minutes, and has no optical low pass filter.
See Mounting big lenses for astrophotography for the basics of how to attach things together when doing astrophotography without a telescope.
Update (Dec 23, 2020) Think it's impossible to photograph the moons of Jupiter without a telescope? Think again. At right is a photo of the conjunction of Jupiter and Venus on December 22, 2020. Three of Jupiter's moons are visible. In the time it would have taken to set up a telescope and find the target, the planets would have set behind the trees. Then again, extreme close-ups of trees are nice too.
See Mounting big lenses for astrophotography for the basics of how to attach things together when doing astrophotography without a telescope.
