 his article describes modifications to a walk-behind lawnmower
to reduce vibration transmitted to the user's hands. With a little
mechanical modification, it's possible to reduce the vibration to
undetectable levels.

The culprit
Vibration from hand-operated tools is a serious hazard. In the early stages it causes numbness and tingling in the hands that lasts for several hours. Over time it can become hand-arm vibration syndrome, which is an irreversible loss of sensation in the fingers, cold sensitivity, blanching, and hand tremor, sometimes known as secondary Raynaud's syndrome. You can't power through it. It's essential to take precautions.
The injury is a function of (1) the amount of vibration, measured in units of acceleration, i.e. meters per second squared; (2) length of continuous time of exposure; (3) number of exposures; and (4) the amount of muscle contraction during use, which increases the efficiency of energy transfer to the hand. Even though a portable electric drill exposes you to 3–4 m/s2, it's less dangerous because few people will use a drill for two hours continuously. An electric pencil sharpener vibrates at 5 m/s2, but even fewer people will sharpen a pencil for two hours straight while grasping an electric pencil sharpener. Those who need to do so are advised not to attempt the procedure below.
The frequency of vibration (and hence the amplitude) might also be a factor. Internal combustion engines vibrate at lower frequencies, though I know of no scientific studies comparing the effects of different frequencies.
Materials needed
| Item | Quantity | Vendor | Part number |
|---|---|---|---|
| Linear motion shaft, 1060 steel, 6",1/4" diam | 2 | McMaster | 1555t121 |
| Heavy-duty external retaining rings, 1/4" (E-clip) | 1 pg | McMaster | 99620a585 |
| Steel rectangular tube, 1/8" wall, 2 1/2×2 1/2", 1 foot long | 1 | McMaster | 6527k414 |
| Steel angle, 1/8" thick × 2 1/2" wide, 3 ft | 1 | Lowe's | |
| Neoprene rubber sheet, 6x6", 3/8"thick, 40A durom. | 1 | McMaster | 1370n18 |
| Black heavy-duty cable ties, 50lb strength | 1 pg | Hoe Depot | 0650889 |
| 1/4-20 flat head and round head screws and nuts | 1 Bx | Any | |
| Pin Rubber door mat, 18×30 | 1 | Lowe's | 1001 503 013 |
| Steel spring, 3/8" i.d. | 1 | ?? | |
| Lithium grease | 1 | Any |

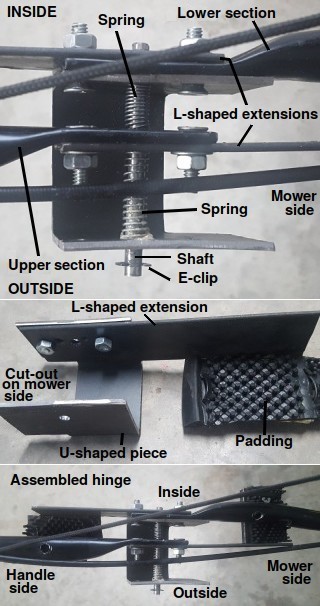
Hinge construction (view from top). Hinge is attached to the lower half of the handle (the mower side)
Construction
Before starting, try replacing the blade and spark plug on the lawnmower and check the drive shaft to make sure it's not bent. Clean any dirt off the blade, as an unbalanced blade will cause vibration. Or try buying a newer model. If that's not an option, the next option is to re-engineer the lawnmower as is done here.
We will be replacing the screws that hold together the upper and lower halves of the handle with a rotating hinge. This will block any energy in the vertical direction. The hinge will also allow the upper half of the handle to move freely left and right, blocking most of the energy in the horizontal direction. So, we get rid of at least two thirds of the vibration.
I found in testing that a hinge is a better solution than trying to absorb it with rubber. In my initial tests, any rubber soft enough to absorb the vibration falls apart from the vibration after a few hours. I now have tiny bits of neoprene rubber all over my back yard. And, somewhere, a couple of ¼-20 hex nuts and a spring.
Procedure
Disassemble the handle at its midpoint. Cut two pieces of square tubing into U shapes and attach one to the outside of the lower handle on each side of the mower. Cut four sections of steel angle into L-shapes and attach them to the upper and lower sections of the handle as shown. These pieces limit the movement of the handle so you can still push it down to turn the lawnmower left and right. There is no steering mechanism on these babies.

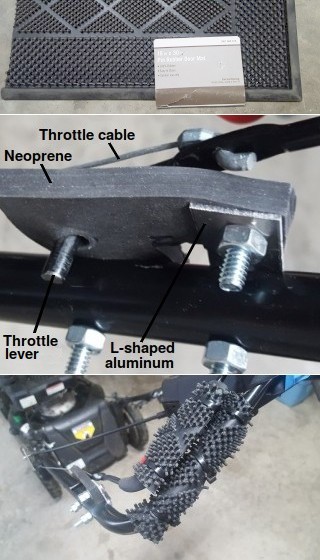
Top: Floor mat. Middle: Throttle lever dampening. Bottom: Looks awful but it works
Bend the upper half of the handle to widen it so it rests inside the U, slap a couple of weak springs on the hardened steel rod, slap it together and secure the rod with retaining rings. Attach bits of the rubber mat where needed. Slap on some lithium grease and verify that the lawnmower still works.
The handle grip and throttle
Some vibration also comes up through the throttle lever, so remove it and mount it on L-shaped pieces of neoprene as shown in the picture. Make sure the throttle still opens to the normal position and closes when the handle is released.
Finally, use cable ties to attach pieces of the rubber mat to all the surfaces on the handle that your hands will contact, including the throttle handle and the clutch (if your mower has powered wheels). The mat should only go on those parts your hands will touch, not completely around the levers.
Results
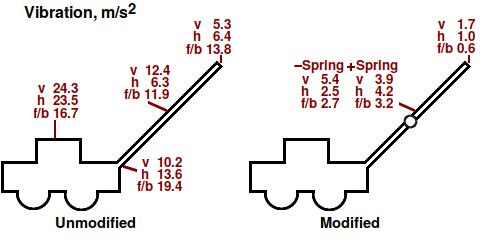
Here are the results on a Sears 4-wheel drive push lawnmower. The modifications reduced the vibration by about 7 times as measured by a vibration meter. Even so, some vibrations were still detectable and I had to wear Ergodyne 9015F(x) vibration-reducing gloves to eliminate the vibration entirely.
At one point I tried attaching springs between the upper and lower sections to keep upper section suspended. It turned out not to be necessary, as the user automatically keeps the sections apart when pushing the mower. Springs also transmitted more vibration to the handle because they drew the two sections closer together, increasing friction on the shaft.

Vibrations measured at various points of a lawnmower. v=vertical, h=horizontal, f/b=forward and back.
I also tried adding weights to the upper half of the handle, thinking the added momentum would dampen the vibrations. It didn't work: the weights increased the friction, making the vibration much worse. Keeping that friction as low as possible seems to be the critical thing.
In my part of the country, I have to cut the grass every week. It takes 1½ to 2 hours. Previously my hands would be tingling and numb for hours. Ominously, each time the tingling would get worse. After making these modifications, that no longer happens.
Now to do something about that pencil sharpener.
june 20 2021, 11:22 am
