 n the past decade, chemiluminescent and fluorescent staining have almost
entirely replaced colorimetric staining for Western blotting. However, many
scientists don't take full advantage of their imaging systems. These devices
are much more than simple cameras, and understanding how they work is essential
in obtaining quantitative data.
I've been horrified to see people trying to analyze images in JPEG format or images taken on a cell phone, or even trying to use Photoshop to quantitate their bands. I've also had people complain that their imager was no good and demand that we buy a film processor, only to discover that they had set the lens aperture on their imager to f/22, effectively blocking 99.7% of the light.
In this article, I will describe what every researcher needs to know about getting valid data from fluorescent and chemiluminescent Western blot images. I will also describe how to upgrade a low-end DNA gel imager and how to build an inexpensive laboratory-grade imager.
Criteria for selecting a fluorescent or chemiluminescent imager
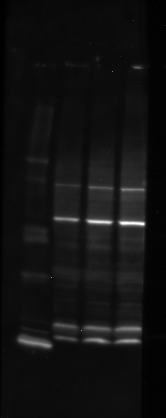
Western blot of c-src in cultured cells imaged by chemiluminescence in a custom-built imaging system, 2-minute exposure. Three hot pixels are visible
Pixel depth The most important criterion is pixel depth, also known as bits/pixel, which determines the number of grayscale values a pixel can have. The pixel depth defines the maximum possible dynamic range. The actual dynamic range is set by the analog-digital converter, or ADC, in the camera. A low pixel depth will make faint bands impossible to see, while strong bands will be saturated, making them falsely appear to be identical. An imager with a resolution lower than 16 bits per pixel is not suitable for scientific imaging.
Even if the software produces a 16-bit image file, it does not necessarily mean you have a 16-bit ADC. Vendors might not know what their machine has, so it's a good idea to get a live demo. Create a histogram on an image and examine the actual numbers. A 16-bit ADC will produce all 65536 distinct grayscale pixel values. A 14-bit ADC will put three zeroes between each number. A 12-bit one will put 15. Of course, programmers could pad the values or low-pass filter the image, which would fill in the zeroes, so this technique isn't foolproof.
A 24-bit per pixel color image can appear to be grayscale, but it is not. A 24-bit color image has only 8 bits of dynamic range, for a total of 256 separate values. It's called a 24 bit image because there are three channels (red, green, and blue). If the R, G, and B are all the same, the image appears to be in shades of gray, but it is still technically a color image and is unsuitable for scientific purposes.
So, what you want is 65,536 shades of gray. Fifty is just not hard core enough!
Pixel value 16-bit ADC 14-bit ADC 12-bit ADC . . . 32704 145 145 145 32705 144 0 0 32706 142 0 0 32707 139 0 0 32708 139 139 0 . . .
Note: if the camera is trying to do video, it will produce fewer bits per pixel because ADC resolution is a trade-off with speed.
Lens diameter Lenses are described by their f/number and their focal length. For example, an f/1.2 50 mm lens has a large diameter lens and a focal length of 50 mm. A big lens, meaning a small f/number, is needed to avoid long exposures, which means more camera noise. This noise can be quite significant: with a small lens, it's often impossible to see any signal at all in a chemiluminescent blot regardless of how long you expose.
There are two parts on a lens that turn: one focuses, and the other is the aperture control, which changes the f/number by closing down the amount of light that gets through. For photographing charging wildebeest there may be times when you need that. For Western blots, keep it at its widest setting. In fact, I recommend gluing the aperture ring to its maximum setting so people can't change it by mistake while they're trying to focus.
Technically there are three parts that turn if you include the lens itself. Turning this one causes the lens to fall off and smash onto your blot. Don't laugh, it's happened.
Focal length determines distance from the blot and magnification. With a long telephoto lens you might have trouble fitting the entire blot into the image, even if you could focus on it.
Cooling For chemiluminescence, a cooled CCD camera is essential because you will be exposing for 5, 10, or even 30 minutes. Without cooling, you will still get an image, but it will have more hot pixels. Hot pixels make quantitation harder, and you need a dark frame correction or a software noise filter to remove them.
TIFF file format Use a computer to examine the smoothness of your image. It should look like the image above. If it looks grainy (or worse, blocky), or if there's visible banding, or if the file can only be saved as a JPEG, it means the camera is not good enough.
Time exposures Make sure the software allows you to take unlimited time exposures. Some cameras close the shutter automatically after 5, 20, or 60 minutes. Some don't have a shutter at all, but stop acquiring an image instead. Cheap cameras close the shutter after ten seconds, making them useless for chemiluminescence.
Using the right exposure is important: if the exposure is too long, the bands will be saturated and useless. If it is too short, all your pixel values will be bunched together and your quantitation will be inaccurate. The goal is to keep the pixels of interest halfway to saturation. If possible, expose all your images for the same length of time and, for goodness sake, write the exposure time down.
Binning The software should allow you to "bin" the image, which trades resolution and image size for sensitivity. Binning of 2×2 gives you four times the sensitivity but only 1/4 the number of pixels. Binning is common for chemi, as a 5000 × 5000 pixel image is hard to email and hard to analyze.
Monochrome vs color Most imagers use monochrome cameras, because color cameras are limited to three channels with broad, overlapping wavelength sensitivities. This is fine for taking cat photos, but it's useless for fluorescence multiplexing. A color camera would also need 16 bits per channel or 48 bits per pixel, which would make the file size three times bigger: an uncompressed 25 megapixel image at 48 bpp would need 150 megabytes of storage.
Fluorescence imaging
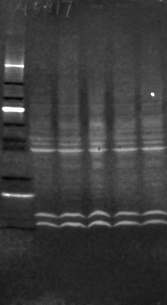
Western blot of actin in cultured neurons, imaged by CFL488 fluorescence in a modified commercial gel documentation system designed for ethidium bromide. Even after stacking of ten frames and flat-field correction it still appears grainy, but it is still usable
Fluorescent Westerns are easy to run: after washing off your excess primary antibody, you add a fluorescently-labeled secondary antibody, incubate for 1h, then dry the membrane and image it. With some modifications, it's possible to convert those $4000 fixed-focus dark boxes sold for use with EtBr-stained DNA gels to do fluorescent Westerns. However, as seen on the image at right, the results are often less than spectacular.
We converted ours to do 488 nm imaging as follows:
- Remove the ethidium bromide filter in front of the camera. These filters are supposed to be held in place with a threaded retaining ring. Ours required a bit of brute force.
- Clean up the broken glass produced in step 1.
- Disconnect the white epi-illumination LEDs (which were quite useless on ours, as they were about 1/2 inch above the focal plane, where the blot would be, and cast shadows on the blot).
- Drill a hole in the side of the box and install a high-intensity blue LED with an appropriate wavelength about 12 inches above the focal plane. (Better yet, install one on each side.) Make sure they are mounted on a piece of aluminum, or they will overheat and burn out. A monochromatic LED emits less light outside the excitation wavelength, making the job of your filter much easier. (A laser is even better, but see below.)
- Install one inch diameter FITC excitation filters (center wavelength 475 nm, bandwidth 35 nm; Thorlabs MF475-35) in front of the blue LEDs.
- Drill four holes around the outside of the camera, being careful to collect any aluminum shavings, and install 3-inch screws pointing down. Make a holder with matching holes from a piece of 1/8-inch aluminum. Attach a 5-position sliding filter mount (Thorlabs CFS1) to the holder and mount the assembly in front of the camera. This makes it easy to remove in case you want to add new filters. See photo below.
- Install a FITC emission filter (center wavelength 530 nm, bandwidth 43 nm; Thorlabs MF530-43) in the filter holder.
- If you plan to use different wavelengths, install the appropriate additional LEDs and filters.
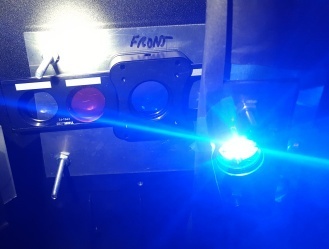
View of blue LED and filter changer (looking up inside imager toward camera). The filter changer is attached to an aluminum sheet (with a hole in front of the camera, not visible here). The filter changer comes in two sections, so it can be rotated down to change filters without removing it. The FITC emission filter (which appears blue) is in front of the camera lens. The blue LED and FITC excitation filter are mounted near the camera
At right shows how a blue LED might be mounted. It's essential to use a good, stable power supply, not batteries. Since blotting membranes are not shiny like gels, they won't reflect glare into the camera, so the light can be positioned next to the camera. Most bare LEDs require a current-limiting resistor. See here for the resistor sizing.
We tried making an emission filter out of orange transparent acrylic (Amber 2422, Delvies Plastics, $14.71 for 12×12×1/4 inch sheet), as its cutoff wavelength is almost as sharp as a dichroic filter (visible in photo at right). It worked almost as well as the $267.52 dichroic filter.
We also tried using a 100 mW 402 nm laser, which we happened to have lying around, as an alternative light source. Putting a diffractive diffusion filter front of it worked spectacularly well, and fluorescent bands were so intense they were easily visible by the naked eye. However, the diffraction filter introduced laser speckle, which made it impractical.
Although a lens produced a speckle-free pattern, the lens-expanded beam contained many imperfections due to the non-Lambertian nature of the laser. Alternatives such as homogenizing light pipes are said not to be suitable for lasers; a flat-top beam shaper, which costs around $5,000, is typically recommended. A 100-mW laser is also hazardous to work with and requires an interlock to prevent accidental exposure. Even reflection from a specular surface is hazardous. (A near-infrared laser is even worse, as you cannot tell whether you're being exposed to it until it's too late. Infrared-absorbing protective goggles are essential.)
These high-intensity blue LEDs are no picnic, either, and looking directly at them is strongly discouraged.
Image analysis of fluorescent Westerns
Background fluorescence is the biggest problem in fluorescent Westerns. Low-fluorescence PVDF must be used. Nitrocellulose and ordinary PVDF give unsatisfactory results.
We found that the camera in our gel documentation system was quite small and gave poor quality images. The manufacturer realizes this and limits the exposure time to ten seconds. (We found we could type any number of seconds in the text box, but the software automatically changed it to 7.955 when we tried to acquire an image.) An easy solution is to collect ten or more images and average them. This is called stacking and it's trivially easy for software like imal to do, as long as the blot doesn't move between exposures. The goal of stacking is to obtain a smooth image, which is essential for quantitation.
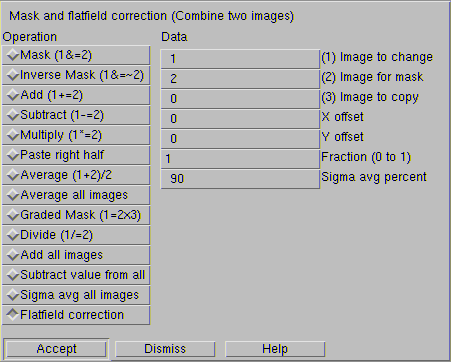
Flatfield dialog box in Imal. Image #1 is your blot and image #2 is your flatfield image. This corrects for any uneven illumination, which must be eliminated for quantitative Western blotting
For quantitation, it's also essential to correct for flatfield, otherwise some parts of your image will be brighter than others. To do this, put a piece of high-quality white plastic in the darkbox, collect ten images, and average them. This only needs to be done when your configuration changes or when you change filters. An ideal source of white plastic is the white sheet inside an old LCD computer monitor. (Wait, don't tell me you don't save those!)
Paper is no good, as it is impregnated with fluorescent dye and fluorescent fibers.
Here are the steps we use:
- Blot onto low-fluorescence PVDF and block with 2.5% BSA for 1h.
- Incubate with primary antibody and wash 3× with TBST.
- Incubate with CFL-488 labeled secondary antibody for 1h. Do not wash the blot.
- Dry blot with a hair dryer and collect at least 10 images, putting them into a common folder.
- Load the images all at once into Imal, resize them if desired, and average them into a single image. Then correct for flatfield as shown above.
- Measure the signal in your bands in Imal by densitometry.
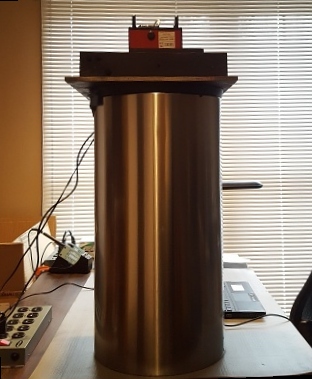
Custom-made imaging system for chemiluminescence. The only thing still missing is a door. That goes on next week
Chemiluminescent Westerns
Chemiluminescence is much more sensitive than fluorescence, but it requires great care and clean equipment to make it work. Chemiluminescence works with PVDF or nitrocellulose but not Nytran.
It also requires an imager with a cooled CCD. Our building didn't have one, so we built one around an SBIG astronomy camera, a Nikkor 50 mm f/1.2 lens, and Nebulosity software. Our custom-built imager created images as good as the GE ImageQuant and Fujifilm imagers, and it was more flexible. Just as important, it only cost one-eighth as much.
The old GE ImageQuants used Apogee Alta U4000 cooled CCD astronomy cameras. Apogee is no longer around and GE spun off its imagers and Typhoon scanners to Cytiva. These babies cost more than an Audi A3, but unlike an Audi, if something breaks it's not so easy to get anybody to repair it.
Astronomers typically select cameras based on the sensor specs. My preference is for the KAF-8300, which is still available in some cameras. Don't forget, it must be monochrome, not color. If you need color images or color fluorescent multiplexing, get an RGB or custom λ filter set and a filter changer.
Imagers are easy to build, but there are a couple extra points to consider.
- Anti-blooming Some astronomy cameras don't have anti-blooming. This makes them more sensitive (i.e. higher quantum efficiency) but if they get too much light they produce a long streak that will ruin your image.
- Read noise Read the specs before selecting a camera. Read noise and dark current need to be as low as possible. Pixel area in square μm, which determines well depth and hence linearity range, needs to be as big as possible.
- Filter size Astronomy cameras sometimes use weird filter sizes. Most astronomy filters are 1 1/4" or 2" (31.75 or 50 mm), while most optics companies only sell 1" or 2" (25 or 50 mm). SBIG was notorious for selling 38 mm filters, which don't fit anything. You may need to buy or make size adapters. If your filter is too small, it may cause vignetting (which is not a big problem for Westerns but looks unprofessional).
- Filter changer An electronic filter changer is valuable if you plan on using it for fluorescence in the future. Don't let your users change filters manually unless you like fingerprints. I discovered that a blue filter from the RGB filter set or a clear filter worked equally well for getting chemiluminescent images. With other filters (H-alpha, red, or green), we got zero sensitivity. Note that every position must contain either a filter or a piece of glass of the same composition and thickness, otherwise your users will need to refocus when they change filters.
- Lens back focal length There is a maximum distance that a camera lens can be from the sensor for the lens to focus at infinity. You need to know this number and how the filter changer affects it. Some new-style lenses designed for mirrorless cameras have a shorter back focal length and might not work.
- Lens front focal length There is also a minimum distance that a camera lens can be from the subject before it can focus. The darkbox cabinet must be high enough to accommodate this; however, if necessary, you can use a macro adapter to shorten the minimum focal length. A macro adapter is an aluminum ring that fits between your camera and the lens and moves the lens a short distance away from the camera. Photographers use them to do extreme close-ups of snowflakes, bugs, and other small objects. The trade-off is that the lens can no longer focus to infinity. But, hopefully, your blot will not be that far away.
- Lens focusing A wide-aperture lens will have a narrow depth of focus, which means it will be tricky to focus it. Many lenses don't like being placed vertically and will slowly drift out of focus. Our solution was to put a big flexible plastic cable tie around the lens. The cable tie passes through a hole and connects to a miniature screw drive stage mechanism (Edmund Optics 53-383) that allows fine focusing from the outside.
- Light leaks Use black FlexSeal and flat black paint. Put a big piece of black polyurethane foam around the lens and use a rubber comfort mat or other flexible material to fill any gaps.
- Computer interface Most astronomy cameras now use USB, but some use Ethernet and a few may have something else. Make sure your computer has the right ports.
- Software Usually the manufacturer provides software with the camera. Sometimes it even runs. I highly recommend Nebulosity, which can handle most astronomy cameras (including SBIG) and does binning and repeat exposures.
- Lens adapters Astronomy cameras typically need an adapter in order to attach a camera lens. Buy as many as you can get, because the vendor will almost certainly stop making them.
Chemiluminescent Westerns take more effort than fluorescent ones, as you have to block them overnight before staining and wash them 6 times after incubating with the HRP-linked secondary antibody. The chemi reagent is also expensive, but you need much less secondary (about 0.15μl / blot), or 66 times less secondary than a fluorescent blot.
In our custom imager, I used an SBIG STF-8300M with a Nikon adapter and 5-position filter changer with a Nikkor f/1.2 manual lens. It works amazingly well. One possible solution for the darkbox is to use a stainless steel kitchen garbage can. They're fairly cheap and reasonably rugged (see photo above) and it's easy to make them light-tight. As long as you remove the foot pedal no one will know what it is. Just don't forget to wash it out first.
jan 24 2021, 10:31 am. expanded jan 26 2021. last updated nov 21 2021.
