Ultraviolet photography with a modified D90 DSLR
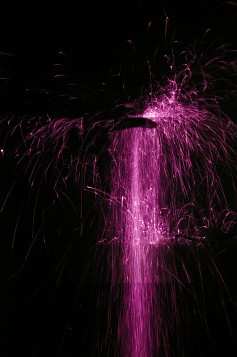
Ultraviolet photo of sparks made by grinding steel
 odifying a digital single-lens reflex (DSLR) camera by removing the two filters
is a common way of increasing its sensitivity to near-infrared light. However,
it also increases its sensitivity in the near-ultraviolet region, between 320 or
330 and 415 nanometers. The change is not as dramatic as in the infrared, but it
is definitely easier to photograph light from a variety of UV light sources
(such as blacklights and violet laser pointers) after the camera is modified.
Unlike in infrared, there is no partial conversion for ultraviolet. Only a full conversion extends the camera's response into the UV region. With an appropriate UV filter, you can also take photographs of stars, nebulas, and planets in the longwave part of the ultraviolet region. Venus is particularly notable, as Venus presents a featureless white disk in visible light, but has sulfuric acid clouds that absorb UV light, allowing astronomers to observe changes in Venus's atmosphere by using a UV-sensitive camera.
The internal filters in most DSLRs are very strict: with both filters present, the 90% cutoff point is around 425 nm. Unmodified webcams are a little better, since their filters transmit light as short as 390 nm (see here for spectrum). By removing the UV-blocking filters on a DSLR, it is possible to detect light as short as 320 or 330 nm.
Most types of DSLR cameras can be modified for ultraviolet. See http://randombio.com/d90infrared.html for instructions on modifying a Nikon D90.
Ultraviolet conversion of Nikon D90| Original D90 | Full IR/UV conversion | |
|---|---|---|
| Wavelength range (nm) | 425-640 | 320-1000 |
| Filters removed | 0 | 2 |
| Reversible | Yes, with minor soldering | |
| Emission Nebulas | No | Yes |
| Reflection Nebulas | Yes | Yes |
| Blue stars | Yes | Yes |
| Extreme UV (e.g., H Lyman forest) | No | No |
| Ultraviolet Movies | No | In direct sunlight only |
| Usable for normal photography | Yes | Yes, if you use a lens filter |
| Relative sensitivity vs. visible | 1/6,000 | 1/100 |
If viewing on a cell phone, drag table left or right to scroll.
Sensitivity
The increase in sensitivity depends on the wavelength. At shorter UV wavelengths, the camera becomes at least 60 times more sensitive than before. Even so, in my tests the camera was still about 100 times less sensitive in the UV than in the visible. Short wavelengths were strongest in the red channel, while longer wavelengths appeared blue. This is the opposite of what you would expect. It's caused by peculiarities in the dyes used to make red, green, and blue pixels on the sensor.
Increase in sensitivity after modification| nm | Sensitivity after/before | Red:blue ratio |
|---|---|---|
| 334 nm | >100 | >30 |
| 365 nm | 62 | 6.6 |
| 390 nm | 5.6 | 0.9 |
| 405 nm | 0.5 | |
| 436 nm | 1 | 0.1 |
If viewing on a cell phone, drag table left or right to scroll.
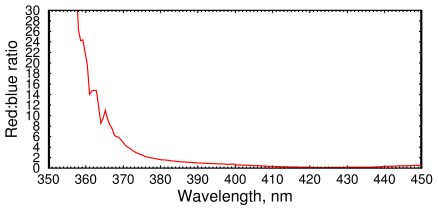
Red : blue ratio for ultraviolet in a modified D90 measured from images of a quartz-halogen lamp.
At wavelengths below 330, the ratio decreases and images start to appear yellow and eventually bluish white (see uv2.html for a discussion of shortwave ultraviolet photography).

Mercury vapor lamp UV spectrum recorded in a modified D90.
The 313 nm doublet from a mercury lamp was easy to photograph. The shortest wavelength I could detect was the 253.6 nm mercury line. It was so faint it was not visible in the spectrograph, even though this line is by far the easiest to detect on a fluorescent screen. A 254 nm UV filter and long exposure were necessary to see it.
Artificial Ultraviolet Sources
With artificial UV sources, no filter is needed. The image below shows internal reflections in a glass cube from a 405-nm laser. The cube (actually a paperweight) was photographed under identical conditions from a converted camera (left) and a normal camera (right). In the normal camera, trace metal impurities (mostly manganese) in the glass produce a green fluorescence that make the light path visible. In the converted camera, much more of the ultraviolet is visible, and the green fluorescence is overwhelmed by scattering of the UV light, which appears pink. Fainter UV scattering into the background (which appears blue) is also much brighter in the converted camera.
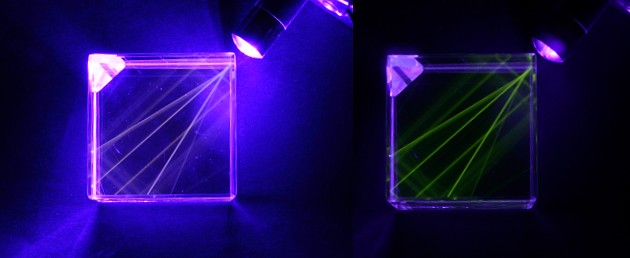
Ultraviolet laser-induced fluorescence in a glass cube. Left=Fully converted D90, Right=Unmodified D7000
Settings: Nikkor 35mm f/1.8G, no filter, f/11, 10s, ISO 200, focus mode manual.
The ultraviolet appears pink because the red pigment on the camera's sensor passes small amounts of ultraviolet light. So as the light gets brighter, the blue pixels become saturated and the color registered by the camera changes from blue to pink.
The glass used in the paperweight contains millions of tiny particles. Although it looks clear in visible light, when placed on a UV transilluminator the cube appears cloudy due to the scattering from these particles. The demonstration isn't as impressive when an optical-quality glass prism is used, because optical glass lacks the fluorescent impurities and the light-scattering particles.

Mercury vapor lamps photographed with normal, modified, and IR cameras. Top = 15 watt germicidal shortwave lamp, bottom = 15 watt black light bulb.
Settings: Nikkor 35mm f/1.8G, f/11, 1/10s, ISO 200. Left=Unmodified D7000 (no filter), Center=Fully converted D90 (no filter), Right=Fully converted D90 with R72 IR-pass filter.
The image above shows that removing the UV/IR filters on a DSLR produces a tremendous increase in sensitivity to longwave ultraviolet light. The upper lamp is an unfiltered UV germicidal lamp, which produces a series of emission spikes from shortwave UV into the visible (see spectrum below). The lower lamp is a filtered longwave UV lamp, a so-called black-light bulb which emits only light between 310 and 400 nm. The longwave lamp is barely visible in the unmodified camera (left), but appears bright pink in the modified D90. The third panel shows that this increase in brightness is not caused by near-infrared radiation. These mercury vapor UV lamps only produce small amounts of infrared light, mostly near the filaments.

UV photo of three mercury vapor lamps in a modified D90 using a 320–380 nm interference filter. Top = 15 watt germicidal shortwave lamp, center = ordinary fluorescent F15T8 cool-white bulb, bottom = 15 watt black light bulb.
Settings: 35mm f/1.8G at f/1.8, 1/320 sec, ISO 1600, Baader UV filter
When a UV interference filter is used, the germicidal lamp appears deep red, a black light bulb appears bright pinkish white, and a regular fluorescent bulb shows up as a dim pink color.
(Warning: don't try the above demonstration at home without eye and skin protection. Shortwave UV can cause serious eye injury.)
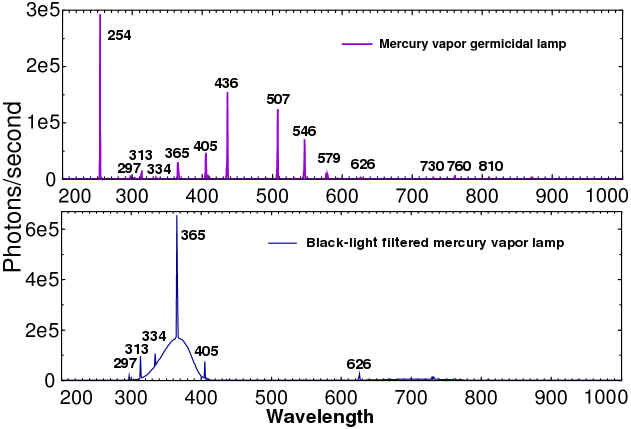
Black light and mercury vapor germicidal lamp emission spectra
Autofocus did not work on either the unmodified camera or the modified camera when photographing these UV lamps. Even the human eye has difficulty focusing on these longwave UV sources. The image below shows that UV scattering overwhelms the fluorescence caused by a 405 nm laser, causing the beam to become visible to the modified camera even in air.
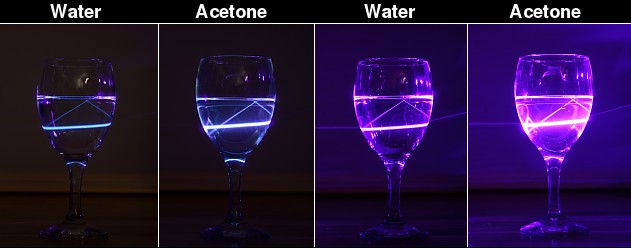
Acetone fluorescence photographed with normal and modified cameras.
Left: D7000, Right=Fully converted D90. Settings: Nikkor 60mm f/2.8D, f/8, 30sec, ISO 200, no filter, Daylight white balance. UV light from a 405 nm laser goes from left to right. In the converted camera, the laser path is also visible in the air due to scattering. Lacquer thinner and vinegar also show strong fluorescence, while ethyl alcohol only shows blue scattering (not shown). Somewhat disturbingly, our tap water was also fluorescent.
The limiting factor for detecting wavelengths below 320 nm is the glass lenses. Silicon sensors are actually capable of detecting ultraviolet light and even X-rays, but glass lenses, glass coatings on the sensor, and other factors limit the practical sensitivity. Even quartz lenses become opaque below about 190 nm.
Another factor is that some lenses cannot be focused past infinity. This can make it impossible to focus on distant objects in the ultraviolet, because the lens can't be moved close enough to the sensor for the UV to focus. This happens mainly with older lenses like the Nikkor 50mm f/1.2.
Filters
To photograph UV-reflecting objects such as flowers, you will need a filter to block the visible and near-infrared light. Some filter characteristics are shown below.
Ultraviolet filters| Wood's glass | UV Black 403 (Schott glass) | Hoya U-330 | Baader HUV-2 | Wratten 18A | Edmund Optics NT64-661 | |
|---|---|---|---|---|---|---|
| Passband (nm) | 230–420 + 670–1000 | 324–400 + 670–830 | 250–420 + 660–1100 | 320–380 | 310–400 + 670–830 | 250–385 + >485 |
| Infrared contamination (%) | about 30–40 | 30 | 50 | 0.5 | 30 | >33 |
If no scroll bar is visible, drag table left or right to scroll.
This table shows that Baader U-filters are the only ones that block both visible and infrared light. Wood's glass filters and UV Black 403 filters are cheaper, but images taken with these filters are always contaminated with near-infrared. Since a modified DSLR is much more sensitive in IR than UV, this means most of the photons that it detects will be in the near-infrared. Thus, you would never be sure whether a particular effect is caused by UV or IR. In fact, many of the “UV” images you find on the Internet are clearly showing effects, such as bright foliage, that are due to contamination.
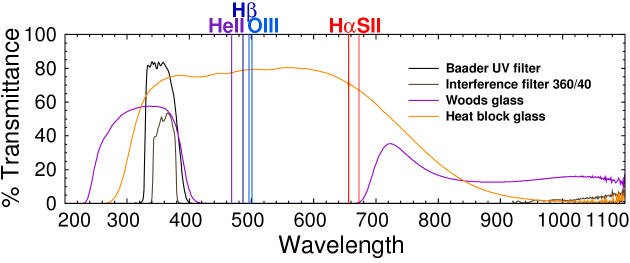
UV-Visible-infrared spectrum of Baader UV filter, Wood's glass, and a 360 nm interference filter. Notice that Wood's glass transmits almost as much in the infrared as in the UV. Since the camera is much more sensitive to infrared than UV, this means that Wood's glass is of very limited value for UV photography.
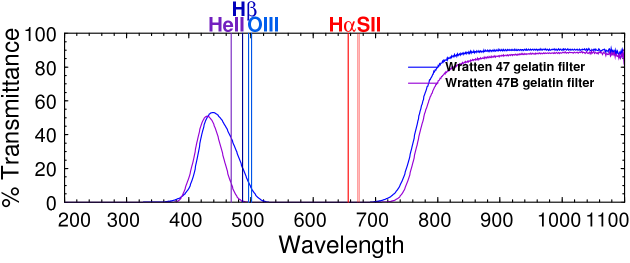
Most photographic filters are useless in the UV region. This graph shows the UV-Visible-infrared spectrum of Wratten #47 and #47B blue filters. However, their transparency in near-infrared makes them useful as inexpensive IR-pass filters. Wratten 18a is better for UV, but still passes too much IR.
The Baader filter is a standard 2 inch round astronomy filter. To use it on a camera lens, you will need a 48mm step-down ring. For example, if your lens has 52mm threads, you would need a 52–48mm step-down ring. The Edmund Optics filters are unmounted, and you will need a filter holder. Alternatively, you can take apart a UV/IR filter of the appropriate size and put your own filter in. Most filters for astronomy are not glued in place but are held in place with a compression ring or a screw ring. Square filters are cheaper but require a special holder such as a Cokin P-series holder.
Unmodified DSLR cameras can also pick up longwave UV light, but at greatly reduced sensitivity. Using a Wood's filter, it is necessary to expose for at least 250–500 times longer for UV than for visible. In my tests, a Wood's glass filter was only useful on an unmodified camera. Images taken with IR-sensitive cameras with a Wood's glass filter were always badly contaminated with infrared.
UV photography should not be confused with fluorescence photography, where objects are illuminated with UV light and visible fluorescence is photographed.
Dealing with Infrared contamination
There are four ways of dealing with infrared contamination:
- Use the blue channel only. This works because infrared light shows up mainly in the red and green channels, while ultraviolet light shows up in the red and blue channels. Unfortunately, because true ultraviolet shows up mostly in the red channel, this means losing most of your signal, and it effectively converts your image to grayscale.
- Take a second image with an infrared filter and subtract the two images. Only practical if the subject doesn't move.
- Use two or more filters. This works, but it gets expensive. For example, one website recommends combining a U330 or Tiffen 18a filter with Schott BG38 or BG40. But if you're going to buy two filters to get a suboptimal result, why not just buy one filter for twice the price that you know will work?
- Photograph your subjects under UV light (see image of lamps above).
Another solution is to use a bandpass interference filter, which passes only a narrow band (e.g., 10 nm) while blocking everything else. For instance Edmund's NT65-191 passes UV between 360 and 370 nm, but blocks everything else from 200 to 1200 nm. NT67-825 transmits 320–385 but blocks all others. Unfortunately the transmission of some of these interference filters is only 25%. This would not be much of a problem when photographing in daylight, but limits their use for astrophotography.
Problems
There are several challenges that are unique to UV photography:
-
Focusing While most lenses are generally pretty good at focusing
near-IR to the same point as visible light, this is not the case for UV. Optics
equations are very difficult to optimize for ultraviolet and visible light
at the same time. As you get closer to the transparency cut-off wavelength of
a material, the refractive index changes dramatically.
So a lens that focuses blue light satisfactorily may have a
focal point that shoots off toward infinity just fifty nanometers lower.
What this means is that you can't just take the UV filter off, focus, then
replace it—the photo will almost certainly come out blurry. You must
focus with the filter in place. In direct sunlight, there is usually enough
light to use Live View. Indoors, Live View doesn't work.
One solution is to point an ultraviolet LED flashlight at the subject. If the subject is less than a few feet away, this provides enough light for Live View to work. The GS Professional UV Inspection Flashlight (380–385 nm) works well with Wood's glass, but a gallium indium nitride 365 nm UV LED flashlight is a better match for a Baader filter. Those cheap 405 nm violet laser pointers are useful for subjects that are farther away.
-
Plastic Most types of plastic are opaque in the UV. The spectra
below show that Lucite (acrylic) plastics transmit very well in the infrared,
but block most light below 380 nm. Polycarbonate (Lexan) is even stricter,
blocking all light at wavelengths shorter than 400 nm. Plate glass contains
green, yellow, or orange fluorescent dyes that can also interfere with UV
photography.
- Exposure times Exposure times are at least 100× longer in the UV than in visible, even with a modified camera. The reason seems to be that the RGB dyes on the sensor itself still block most of the ultraviolet. A tripod is essential. UV movies will be underexposed unless taken in bright sunlight.
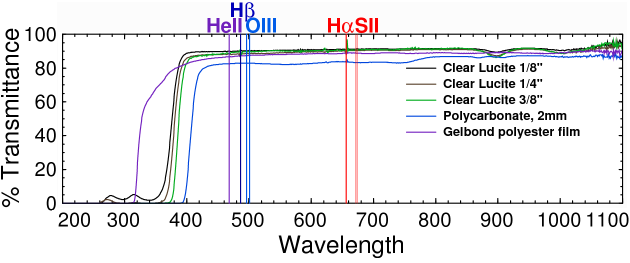
UV-Visible-infrared spectrum of clear acrylic (Lucite), polycarbonate (Lexan) plastics, and Gelbond polyester film.
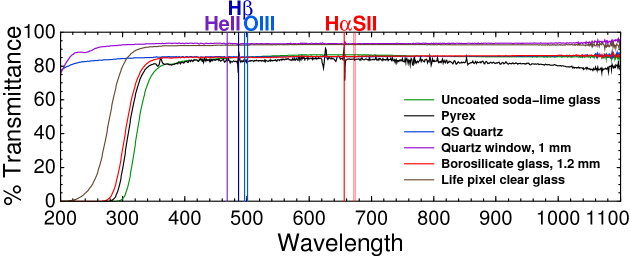
UV-Visible-infrared spectra of soda-lime glass, Pyrex, borosilicate glass, and quartz
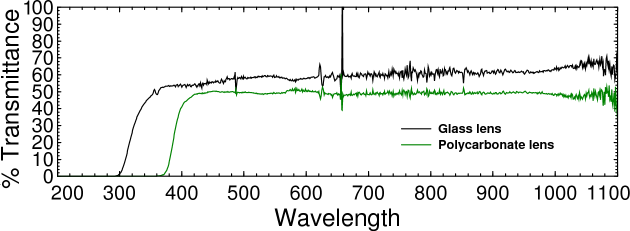
UV-Visible-infrared spectra of plastic and eyeglass lenses. Plastic lenses cut off more ultraviolet than glass. Transmission is lower than you might expect because the lenses are concave.
Lens Aberrations
Another potential problem—er, challenge ... I mean, opportunity—is that some lenses just will not focus UV light to a sharp point. Coma tends to be a particular problem for lenses in ultraviolet. One unusual type of aberration is a Star Wars-type effect like the infrared photo of Jupiter shown below. This is caused by the 80–200 zoom lens zooming by itself (known as lens creep) under the force of gravity while the camera is pointing straight up. The only solution is ... don't do that.
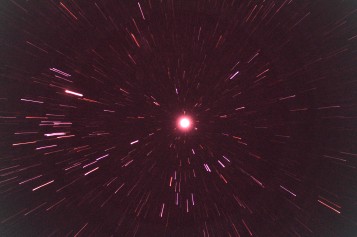
Lens creep distortion in infrared image. Settings: Modified D90, R72 filter, Nikkor 80–200 f/2.8D, f/3.2, focal length 86 mm, 9 sec, ISO 1600.
Natural Ultraviolet Sources
Below is a photo taken in the early morning under overcast skies with a modified D90 and a UV interference filter.
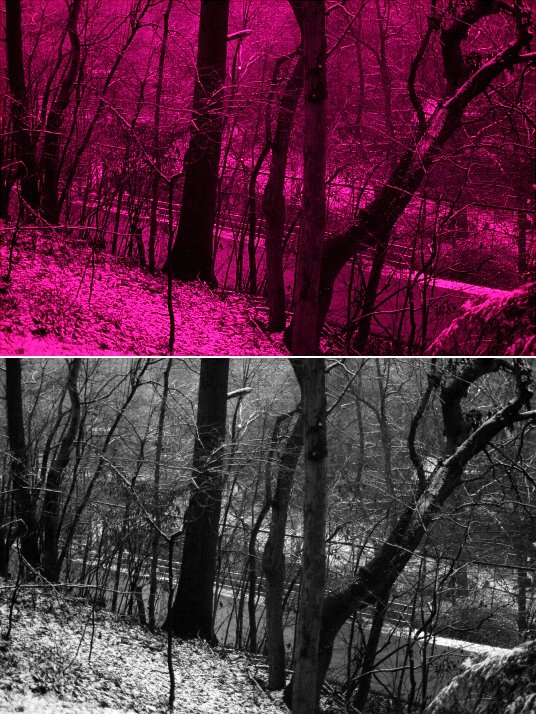
UV photo of snow-covered trees, road, pond, and ground. Upper = raw UV image, Lower = converted to grayscale.
Settings: Modified D90, Baader UV filter, Nikkor 35mm f/1.8G, f/1.8, 4 sec, ISO 1600, manual focusing, 12-bit Raw (NEF) file.
The ultraviolet world has very high contrast. Shadows are dark and gloomy, vegetation looks dark, and the sky is a bright violet—almost indistinguishable from the clouds. Surfaces appear duller and less shiny. Surprisingly, the red channel is more sensitive to UV than the blue channel, and a raw UV image looks reddish-purple. Because of the high contrast, the red channel often becomes saturated, while the shadows are solid black. The green channel usually contains no information. Since there is almost no real color information in UV photographs, it makes sense to convert them to grayscale. Because of the high contrast, it is almost mandatory to set the camera to Raw 12- or 14-bit mode.

Comparison of IR and UV photo of trees and sky. Taken in mid-afternoon under a blue sky + contrail (Modified D90, 200mm fl quartz lens, f/7.2, ISO 200. Left: 1/100 sec, R72 infrared filter; Right: 1/10 sec, Baader U ultraviolet filter).
Flowers show unexpected patterns in ultraviolet light. Night photos of urban settings will capture mainly light from mercury vapor lamps and their reflections. Electrical discharges like lightning, sparks, and corona discharges are also strong sources of UV. UV light is scattered more strongly than longer wavelength light by gas and dust in the atmosphere.
UV photography has another advantage: there's no need to carry a light meter. Just listen to the weather report and use the UV index!
Ultraviolet Astrophotography
UV astrophotography is a great way of identifying highly energetic events in space, such as supernovas. Unfortunately, long exposures are required because of the low sensitivity of the modified camera. Exposures of 30 minutes or longer are needed, even when using a fast camera lens. With a telescope, exposures are measured in hours. The fact that the atmosphere absorbs and scatters shortwave UV doesn't help. Focusing is also a bit trickier, and some lenses have difficulty achieving a sharp focus. However, light pollution is much less of a problem in the ultraviolet, and the background appears unnaturally black and contrasty.
O and B-class stars, such as the blue-white stars in the Pleiades, show up the most easily in the ultraviolet, as do the three O- and B-class stars in Orion's belt (from left to right: Alnitak, Alnilam, and Mintaka in the image below). Stars that are brightest in the infrared may be faint or invisible in UV (for example, the IR-bright star just above Mintaka). The central portion of the Orion Nebula (lower center) also emits large amounts of UV radiation and is fairly easy to photograph. In general, reflection nebulas can be photographed, but hydrogen recombination nebulas are not visible. For example, the Flame Nebula (upper left, next to the bright star Alnitak) only shows up in IR and visible, while the the Horsehead Nebula (below Alnitak) only shows up in the visible. (I'm counting 6562.8Å as visible, though commercial cameras need to be IR-modified to see it).
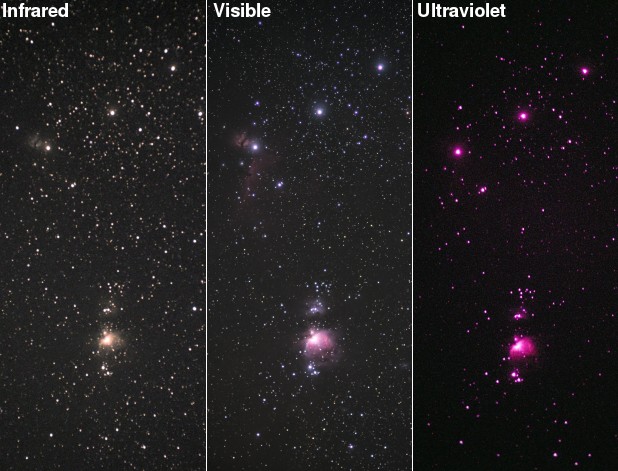
Orion Nebula in infrared (left), visible (center), and ultraviolet light (right). Cropped and resized.
Modified D90 on CGEM, no guiding, transparency 4/5, seeing 3/5, temp 25F
Lens: Nikkor 80–200 f/2.8D, focal length 135 mm, f/2.8
Infrared: ISO 400, 9.1 min; Visible: ISO 400, 6.3 min; UV: ISO 3200, 56.8 min.
Ultraviolet images of the moon are subtly different than visible images, and show more contrast in the white areas (highlands and radial spokes of light-colored ejecta from the larger craters). The contrast is increased because rough surfaces reflect poorly in ultraviolet.
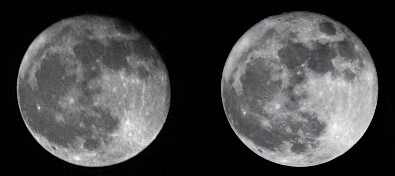
Moon photographed in ultraviolet (left) and visible light (right).
Modifying the Camera
As mentioned above, although you can capture some UV images in a regular camera if you expose long enough, the camera really needs to be modified to get reasonable UV sensitivity. This means removing the blue color-correction filter and the dichroic IR/UV block filter, just as you would do for full infrared conversion.
Unless you replace the color-correction filter with a piece of UV-transmitting glass, removing the filter throws your autofocus out of calibration, so you would have to focus with Live View on then on, unless you know how to re-calibrate it (which is actually not difficult). Or you can focus manually, which I do with the lenses that I make.
Camera lenses are another matter. Many camera lenses have antireflective coatings that block all light below 380 nm. Some block everything below 400 nm. So a fused silica lens, like the legendary Nikon UV-105, would greatly improve the signal.
Realistically, these are only partial solutions because the thickness of the silicon sensor itself absorbs the shortest wavelengths. Then there's the Bayer coating on the sensor, which also absorbs a lot of UV, and the protective piece of glass that is bonded to the sensor itself. To achieve really good UV sensitivity, you would need a back-thinned CCD sensor designed for ultraviolet.
Quartz lenses and ultraviolet to visible image converters
Another possibility is to use a quartz lens to focus the UV light onto a phosphor screen and photograph the screen with a regular camera. According to James R. Janesick, a yellow highlighting marker creates an efficient phosphor coating that can allow detection of UV light down to 50 nm. Almost down to X-rays, baby!
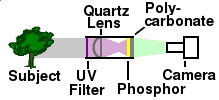
Ultraviolet to visible image converter.
The phosphor that Janesick uses is Lumogen yellow S 0790 (2,2′-dihydroxy 1,1′-naphthalazine), aka Pigment Yellow 101. Unfortunately, most modern highlighters use Basic Yellow 40 or Acid Yellow 23 instead. For this to work, the dye must be applied directly to the chip. This means the protective glass must be removed—a very difficult and risky procedure. The procedure must be done with a torch or micro-milling tools under a microscope and is a specialized skill.
In my tests, I made a fluorescent screen using a yellow Bic highlighter on a piece of polycarbonate as shown in the diagram at right. Polycarbonate is the ideal substrate for a phosphor screen, because it blocks all UV below 400 nm. Using a jury-rigged setup, I was able to capture some nice green images of a 365-nm blacklight, but the sensitivity was lower than focusing the ultraviolet directly into the modified camera.
The problem here is that, when projected on a screen, the secondary light goes in all directions. Only a small percentage travels toward the sensor. For example, if the screen was 20 cm from a camera with a 5 cm diameter lens, you would only capture 1/256 of the total light. Even if you coated the sensor itself, at most half the fluorescence emission will be detected. The rest travels back toward the lens and is lost.

Comparison of quartz lens vs. glass lens for ultraviolet photography.
Settings: Left=f/3 fused silica lens, Right=f/2.8 Nikkor 60mm f/2.8D. Both images were taken with a modified D90, 1/20 sec, ISO 1600. The quartz lens was over four times more sensitive than the glass Nikkor lens. Quartz also changed the red:blue ratio in the image from 1.07 to 2.7, indicating that the camera is picking up shorter wavelengths. Short wavelengths appear red due to peculiarities in the RGB coating on the sensor. Spherical aberration is evident in the quartz lens.
I also made a camera lens using a 1-inch diameter fused silica plano-convex lens ($80 from Thorlabs). The lens had a focal length of 75 mm, which made it f/3. Used with a Baader U filter, this quartz lens gave 4-fold increase in sensitivity over a standard Nikkor 60 mm f/2.8 coated glass lens. However, the optical quality was not as good as the Nikkor lens and the lens exhibited severe spherical aberration (see photo at right). Optimization of the design is clearly necessary.
Although it is possible to reduce the distortion by stopping down the lens, a better solution is to use an aspheric lens, which produces two orders of magnitude better image quality than a spherical lens. Unfortunately, aspheric quartz lenses are quite expensive. A cheaper strategy was to counteract the absorption by using a large diameter lens, such as a 5-inch diameter glass magnifying glass. Clear white glass lenses worked best. The increased light-gathering capacity of the large lenses compensated very well for the glass absorption, and gave images that were almost as bright as the quartz lens. The best lens proved to be a 50.8 mm N-BK7 A coated + meniscus lens, fl 300 mm (Thorlabs LE1985-A). Although the red:blue ratio of the resulting image was only 2.3, indicating that some short wavelengths were being lost, the image was quite sharp and had little noticeable spherical aberration. This is attributable mainly to the long focal length.
Large-diameter quartz meniscus lenses also work well, but they're expensive: a 2-inch diameter 200 mm focal length (f/4) fused silica meniscus lens will give you 4 times the UV sensitivity as a one-inch lens with the same focal length, but will cost over US$300. Make sure the lens is uncoated: some quartz lenses have an AR coating that cuts off the shortest wavelengths.
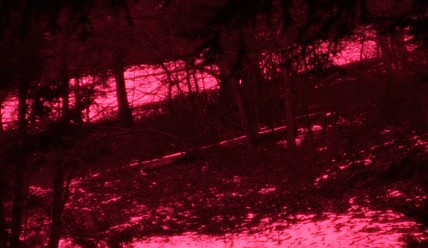
Ultraviolet photo of trees and snow taken with a quartz lens. The halo effect around the bright snowy areas is caused by different UV wavelengths being focused at different points (spherochromatism). (Modified D90, homemade fused silica lens, fl 200 mm, f/7.16, 2 second exposure, ISO 200, Baader U-filter; cropped and resized, slight sharpening applied)
Recently I got ahold of a two-inch quartz meniscus lens for testing, and used it to make a camera lens. This lens produced UV images that were between 45 and 134 times brighter than conventional glass zoom lenses at comparable settings. The Nikon 18–300 zoom lens was the worst conventional zoom lens for UV, producing a red/blue ratio of 0.9, which means that almost no ultraviolet was passing through it. By contrast, outdoor photos of snowy scenes taken with the quartz meniscus lens had a red/blue ratios around 5.0–5.5, indicating better transmission of shorter UV than even the plano-convex quartz lens. However, at full aperture the lens still produced images that were fuzzy compared to the Nikkor lenses, and in brightly lit scenes the red channel showed bad halo unless the aperture was reduced to f/7 (see photo).
It was also necessary to use a UV/IR blocking filter when using this lens to photograph in visible light, otherwise the UV and IR light caused bad chromatic aberration. This means a quartz lens always has to be used with some kind of filter. A meniscus lens is asymmetric, and has to be oriented with the convex side toward the subject, or it will produce lots of spherical aberration.
The long focal length of this lens also gave a telephoto effect, which would be a little inconvenient when photographing flowers. But there aren't many flowers round here.
Update: UV images of flowers
Update (Apr 21, 2013) I finally got around to modifying my UV lens to give it a shorter focal length and better image quality. Here are UV and visible photos of a dandelion and a blue vinca flower, presented, as Rod Serling used to say, for your consideration. See here for more UV images.
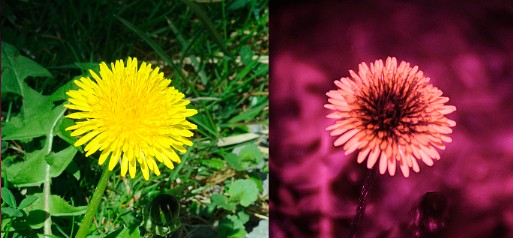
Visible and ultraviolet photos of dandelion taken in a fully modified D90 with a fused silica lens. Many types of flowers have a dark area in the center that is only visible in the ultraviolet. However, it's only a myth that the dark area is necessary for insects to find the center of a flower. Many (in fact, most) flowers appear uniformly dark in the ultraviolet.
Left: Nikkor Micro AF 60mm f/2.8D, f/16, 1/160s, ISO 200, no filter
Right: Homemade 54mm fused silica UV lens, f/7.2, 1.8s, ISO 200, Baader U-filter
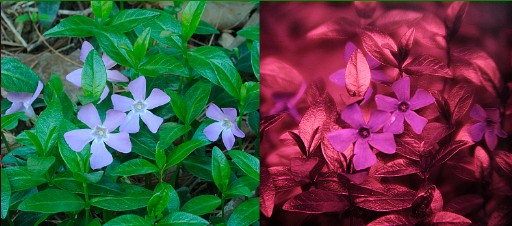
Visible and ultraviolet photos of vinca flowers showing dark center area in UV. Left: Visible, 60mm, f/16, 1/5s; Right: UV, 54mm, f/7.2, 2s, Baader U-filter
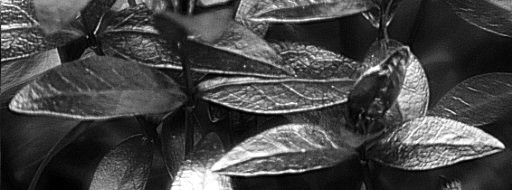
Ultraviolet photo of vinca leaves. Although dark, vinca leaves are unusually shiny in the ultraviolet and have an almost metallic appearance. (UV lens, 54mm, f/7.2, 2s, Baader U-filter)
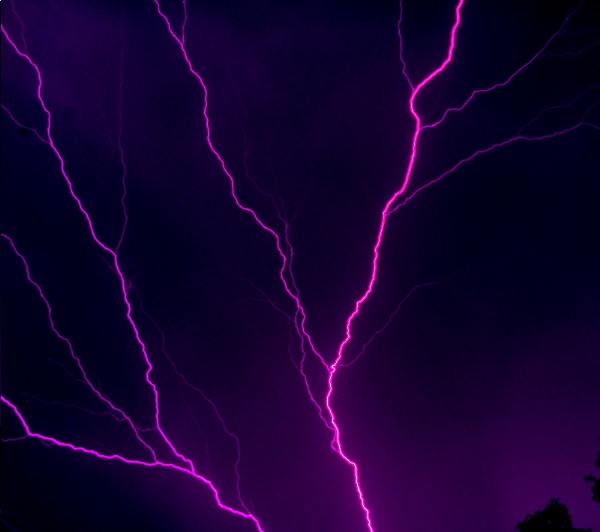
Ultraviolet photo of lightning. (f/2, 50mm, 10s, Baader U-filter)
