What is the difference between a wireless access point (WAP) and a wireless router? A router sits between your computer and the Internet and controls the traffic going in and out, usually handing out IP addresses to your devices, and sending IP packets to the right place. A wireless access point is a peripheral device that sits on your network, not doing very much, but allowing wireless devices like laptops to connect to it, and from there through your existing router and firewall to the Internet.
If you already have a router and firewall, adding a second router is a bad idea. Once you get the AX1800 running, you can configure it to stop routing and be a WAP. But that's not so easy.

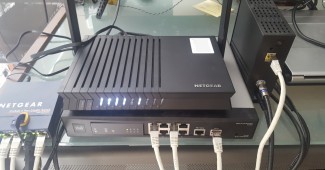
Netgear AX1800 WiFi 6 router on top of a router. The white patch cables are shielded Cat6. The shielding prevents radio interference
In the old days, setting up these devices was easy: set your computer's IP to 192.168.1.4, point a browser to 192.168.1.1 or some similar number, and log in with a browser. That doesn't work on the AX1800. The AX1800 grabs an IP from your DHCP server but doesn't respond to it. It also doesn't respond on its default IP (192.168.1.1). You have to use a cell phone with WiFi and use Netgear's "app" to activate it first.
The little piece of cardboard that comes with the router makes it sound simple: Install Netgear's Nighthawk app on your cell phone and run it. If that doesn't work, visit http://www.routerlogin.net to install it manually. This website tells you to install the Nighthawk app on your cell phone and run it. You also have to create an account and install a temporary version of Netgear Armor, which Netgear claims “blocks malicious sites and applications starting at your router” and apparently works through Bitdefender. It helpfully tells you that after a 30 day free trial it's going to nag you to buy it for $70 per year.
Installation
Hide your sledgehammer before starting.
Connect a patch cable from a free port on your network switch to the yellow "internet" port on the Netgear.
Turn off WiFi on your cell phone, then download the Nighthawk app from Google Play Store (or wherever you get apps from) and install it. If Goggle Play says "Please open my apps to establish a connection", go into Settings→Apps→Google Play Store on your phone and tap Clear Cache then Clear Data, and try to download it again.
I avoid visiting Google Play as much as possible, as cell phone apps take advantage of the connection to download new versions of themselves with more ads. That happened in this case.Turn WiFi back on on your cell phone. This is essential, because the cell phone has to talk to the router over WiFi.
Run the app. Ignore all the steps where it says to unplug and disconnect your cable modem. It is trying to take over your network. If you already have a router, this is not what you want. You will also have to point the cell phone's camera at the QR code on the top of the router.
If it succeeds, write down the SSID and Network Key (password). They're printed on the router as well. You will also set an admin password, which is different, and it asks the usual bogus questions about your dog's maiden name. If you forget your password, you can re-set it by entering the router's serial number.
Disconnect the patch cable from the yellow "internet" port and plug it into one of the regular ports on the back of the router.
Set one computer on your network temporarily to 192.168.1.4. Type 192.168.1.1 in a browser. The login screen should appear. Enter the username "admin" and your admin password.
If you want to give the WAP a static IP, set it now to something on your network.
Click Advanced Settings→Wireless AP→Enable AP mode. Scroll down on this page and turn off DHCP by clicking "Enable fixed IP settings on this device (not recommended)" before clicking Apply. Otherwise it will ignore the static IP you just gave it and grab a new one from your server when it boots up. Click Apply.
It will reboot. This takes 2–3 minutes. Re-connect via a browser through its new IP address. Click Advanced and check that it now knows its IP, your gateway IP and DNS servers.
Note: DON'T click on this to check the settings! Even if you click Cancel it goes through Updating Settings again, reboots, and goes into never-never land. You can recover by power-cycling it.
Try to connect from a wireless device. Typically at this point Windows 10 will say "Can't connect to this network". If so, follow the steps here. On my laptop, it was necessary to do a complete network reset before it would connect.
Take your sledgehammer out of hiding and keep it handy. You might need it to perform maintenance on the router when the 30 day "free trial" is up.
