Modifying a CGEM telescope mount
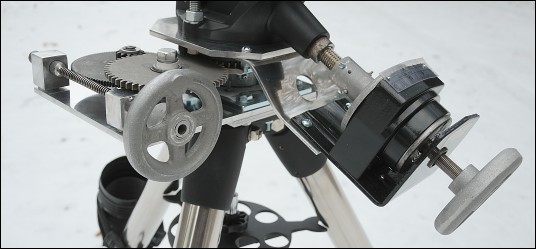
 Modified telescope mount
 he Celestron CGEM German equatorial mount is a popular mid-range mount suitable
for astrophotography. However, it's designed to be aligned electronically. It
does have little manual knobs for users who wish to polar align it manually, but
these knobs aren't capable of making fine adjustments.
The problem is: making fine adjustments is exactly what you have to do if your observing site is surrounded by buildings and tall trees that obstruct most of the sky. On those rare occasions when one of the stars on Celestron's list is visible, I can use the computer to align the mount. Most of the time, not. So if you want to align a CGEM manually, you need to modify it. That's because the slightest turn of those little knobs moves the mount by several arcminutes—enough to completely throw off your polar alignment. This page shows how to attach gears that make this task easy.
Materials
Two places to buy gears are https://sdp-si.com/ and W.M. Berg . Unfortunately, buying large gears is an expensive proposition. For example, a 5 inch 120-tooth brass gear is $89. Some online vendors provide minimal descriptions of their gears. And most of the time, the size you need is out of stock anyway.
Luckily, there's a solution. You can buy cheap winches from Harbor Freight for about 100 bucks. For example, HF's 96455 12 Volt Electric Winch has a 400:1 reduction ratio. To get such a high ratio, they use a long chain of 10 to 1 gear reductions. One of the gears matches perfectly with a 3/8-8 Acme threaded rod (8 bucks per foot at McMaster.com). So for a hundred bucks, you get:
- One 5-inch 120 tooth 5/32" thick cast iron gear
- Three 4 3/4-inch 55-tooth gears
- One 12-tooth 1 1/16 inch diameter gear
- One 23-tooth gear
- Two other smaller gears, attached to the larger gears, one of which has axial needle bearings
- Four ball bearing joints
- One 12 volt electric motor
- 30 feet of steel cable
Plus you get a hook and about 30 pounds of heavy-grade scrap steel. It's like Christmas. I would never recommend using a winch like this to pull somebody's car out of a ditch, but as a collection of spare parts, it's a bargain. This Chinese stuff won't be cheap forever. Stock up while you can.
You also need two 4" diameter aluminum hand wheels and 2 or 3 pieces of 12×12×1/4" aluminum plate. You will need a 5-inch turntable or lazy susan. Although you could use an ordinary 5-inch lazy susan, a heavy duty turntable like a 22345T2 (McMaster) is more rugged, having a capacity of 1500 pounds. Unfortunately, this turntable has a lot more wobble than a lazy susan. It's necessary to stabilize it by inserting small pieces of Teflon or aluminum between the upper and lower plates.
Modifying the azimuth adjustment
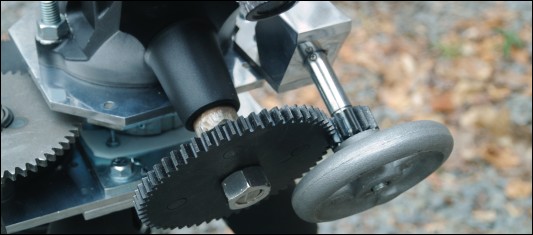
 Azimuth adjustment gears in modified telescope mount
Drill four 1/4-inch holes through one of the 55-tooth gears and attach it to the upper part of the turntable. It's critical for the center of rotation of the turntable to coincide with the center of the gear, with the axial center of mass of the mount, and with the center of the tripod.
On top of the gear, attach a spacer made of oak or some other lightweight material. The spacer needs to be at least as thick as a 1/2" nut. Cut notches in each side of the spacer and drill 1/2-inch holes on either side of the mount. Cut two 2-inch pieces of 1/2-inch threaded rod. With a nut on each end, these will hold the mount in place. Drill a large hole in the center of the spacer for the CGEM's center post to fit through.
All the other gears for the azimuth assembly, and the lower part of the turntable, should be attached to a large 1/4" aluminum plate. Attach a smaller plate to the top of the tripod. Its function is to create a surface and mounting points for the larger plate. This is necessary because it's not easy to attach things directly to the tripod. Use an axle grinder to cut off the four corners of the top plate of the turntable if it gets in the way.
Some precision is needed in mounting the gears to avoid backlash. Alternatively, the center gear could be mounted on an movable axis which uses a spring to keep the gear teeth tightly meshed.
For the worm, it's helpful to silver-solder short bits of steel tubing on each end and use two small blocks of aluminum to create journal bearings. Otherwise, the Acme teeth will cause the rod to rotate unevenly. (Plus, it will look stupid.) Drill small holes on the outside of the aluminum bearing and insert small pins or 4-40 screws to hold the rod in place.
Attach the aluminum hand wheel by press-fitting. This is done by drilling a hole in the hand wheel almost big enough for the rod to fit. Then use a torch to heat the wheel and ice water to cool the rod. It should slide on easily (or maybe with a little percussive encouragement). When the temperatures of the two parts equalize, it will be firmly attached. The disadvantage of press-fitting is that you only get one chance to get it right.
Since there are 120 teeth on the worm gear, and a further 5:1 reduction between the first and the middle gear, it takes 600 turns of the hand wheel to make a complete revolution of the mount. That doesn't mean it's easy to turn, though, because worm gears are very inefficient at transmitting torque.
Modifying the altitude adjustment
 Altitude adjustment gear assembly in modified telescope mount
Gearing down the altitude adjustment is trickier than gearing down the azimuth. Because the lead screw moves in and out, any gear that's directly attached to it will not remain at a fixed distance from the body of the mount. Therefore, it's necessary to make one of the gear positions adjustable.
Normally, the altitude alignment is adjusted by tightening a screw which pushes up the front of the mount. This screw was very wobbly on my mount, so I replaced it with a longer M18 stainless steel rod, and added a fixed nut to keep it steady. To gear it down, I first tried another cheap 12-volt winch (Superwinch LT2000 Utility Winch, $64.99 from Amazon) to replace Celestron's black altitude adjustment knob. This worked, but the 135:1 speed reduction made it way too slow, so I used two more gears from the original winch to obtain a 1:5 speed reduction instead.
The altitude gear and bearing should be attached to the upper part of the turntable. I used a small block of aluminum to create the bearing. It might look like a tight fit from the photograph above, but actually there's more than enough space there to reach in and check the polar alignment. The modified mount (including tripod) weighs 82 pounds, not including counterweights. Yes, it's heavy, but it works beautifully.
See mount-photos.html for more detailed photos. Sorry, an engineering diagram is not available.
If a winch doesn't work, you can try a wench instead. But they're a lot more trouble.
Addendum: Replacing the hand controller connector
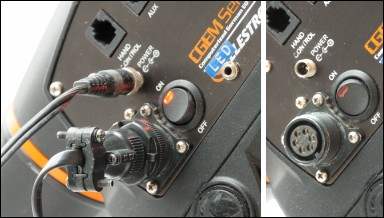
 MIL/spec hand controller connector
I would be remiss in not mentioning Celestron's infamous CGEM hand controller problem. The hand controller in a CGEM is connected to the mount by a small six-pin modular (6P4C) phone-style connector. When I first powered up my CGEM, I got the dreaded "No Response 17" error message. Sometimes, if I held the hand controller perfectly still and tried not to breathe, it would make it all the way to "CGEM Ready" and then give an error during the alignment. When that happens, it's necessary to power-cycle it and start over, which erases all the alignment data. No amount of bending or tweaking of the contacts was able to solve this problem completely.
Unfortunately, in my part of the country there is no way to ship anything back to the manufacturer. FedEx has never been able to find my house, the mount is too big to fit in my mailbox, and anything sent by UPS is never heard from again. The closest dealer is a multi-hour drive away. So I had to repair this brand-new mount myself.
It turns out that the problem was with the connector. An RJ-style connector is not appropriate for something that might move or be subjected to stress. In this case, if the controller loses contact with the mount even for a split second, the firmware crashes and the error message is displayed. Users of the GoTo feature also have to worry about power. If the mount loses power even for an instant, their alignment is lost and they have to start over. In my opinion, these are all serious design flaws.
To replace the connector, I installed a Mil/spec threaded six-pin circular connector (Mouser 855-M90-3106F14S-6P and 855-M90-3102R14S-6S). Together, these parts cost about $30, but it's worth it to avoid the aggravation. I wired it up in parallel with the old connector and left the old one in place, in case I ever had to buy a new hand controller. It was a simple fix as far as the electronics went. But when I powered up the mount after installing the new connectors, the hand display showed solid black rectangles instead of letters. After switching it on and off a few times, and making a few caustic remarks about the genealogy of the electronic components (which I won't repeat here) [1], it started working again. It has worked perfectly ever since.
[1] These are actually magical incantations invoking various deities, and remark upon the likely fate of the objects in question should they fail to start working. Electronic devices can tell when you're serious about threatening to dismantle them. Keeping a six-pound sledge hammer and some mangled electronic components where they can see them is remarkably effective.
Other problems
Like any mass-produced product, there are many small problems. One problem is that the RA motor doesn't shut off after you stop pressing the right arrow key. The mount continues to move until you press the opposing key. This seems to be a firmware problem, not a sticking key, but so far the evidence is that it doesn't interfere with autoguiders.
On the other hand, thanks to the stainless steel worm and brass worm gears, the tracking on a CGEM is generally good. My unit didn't even need PEC or autoguiding when it was new, as long as the exposures were less than 1-2 minutes. However, after two years of use (and abuse), the gears have become worn, and it now has about 40 arcsec of periodic error. Hypertuning, adjusting the backlash, and changing the bearings can't fix this problem. Autoguiding of a CGEM is mandatory for exposures longer than a few minutes.
