
Installing a Virtual Private Network with OpenVPN
Introduction
With OpenVPN, it is easy to set up a virtual private network between Windows clients using a dialup connection and a Linux server. The clients can do ftp and telnet securely and Windows clients can securely browse the intranet running Samba.
This document describes how to set up OpenVPN between a host computer running Linux and remote Windows clients. The Linux host acts as a secure gateway to the intranet, which consists of a number of Windows computers and Linux machines running Samba. Both ends of the link receive virtual IP addresses. OpenVPN is much easier to set up than OpenSWAN. The downside is that OpenVPN does not prevent unencrypted traffic from flowing along the connection. To block this, OpenVPN must be used with a firewall to throw away the unwanted packets.
As with OpenSwan, it's essential to watch the traffic with tcpdump at every step. If set up incorrectly, a VPN may allow your computers to communicate without actually encrypting a single byte. Remember, being able to ping from both sides does not necessarily mean your VPN is working!
What is a VPN
Here's the blurb I give to our end users:
A VPN (virtual private network) is client/server software that allows you to connect securely to a remote network from anywhere, including over a modem or a broadband connection. Our VPN will allow you to browse computers on the network as if you were at work. You can drag files from your computer at work to your home PC, send email through our server, and everything else you can do at work. This lets you do work at home at night, on weekends, and on holidays as if you were in the office 24 hours a day, working continuously!
Our VPN gateway is named "endive". Once you are connected to endive, you will have complete access to our internal network. However, all your communications will be encrypted so that hackers on your remote network can't read any of your information. Access to our network is controlled by a certificate, which is a special encryption code that is different for each user. No one else can access our VPN unless they have a valid certificate. If you lose your computer, or someone steals your certificate, please let me know and I will give you a new one.
Installation on server
- Install openssl, lzo, and pam if you don't have it already. If you're building your own RPM, you may also need openssl-devel, lzo-devel, and pam-devel.
- Configure openssl if desired by editing the file
/usr/share/ssl/openssl.cnf
- If necessary, install the lzo real-time data compression library (liblzo.a)
from
http://oberhumer.com/opensource/lzo/download/lzo-1.08.tar.gz
./configure
make
make check
make test
su
make install
- Install OpenVPN on the linux server.
tar -xzvf openvpn-2.0.2.tar.gz
cd openvpn-2.0.2
./configure
make
su
make install
- The server must have a fixed IP address or a
DNS registered hostname so the clients can find it.
If not, goto no-ip.com, create a dynamic DNS account,
download their noip client software,
configure it by typing
and start the client by typing/usr/local/bin/noip2 -C
/usr/local/bin/noip
Installation on client
Click on openvpn-2.0.2-install.exe and click "Next" to begin the installation. After installing, reboot the computer. OpenVPN will install itself in C:\Program Files\OpenVPN and create a directory there called "config". The Windows version of OpenVPN will only run on W2K or later. Normally, you must have administrator privileges to install or run OpenVPN (but there are ways around this).
Create Keys on Server
Generate keys for the server and for each client manually using SSL. Version 2 of OpenVPN includes some scripts that make this easier. If you use SuSE Linux Enterprise server, it is also possible to use PKCS #12 formatted key files created by YaST2 (see "pkcs12" directive in OpenVPN man page).
- Edit the vars file and replace KEY_COUNTRY, KEY_PROVINCE, KEY_CITY, KEY_ORG,
and KEY_EMAIL with local values. Then source the vars file and create a master
certificate and key for the CA (certificate authority) on the server.
For "common name" enter the hostname of the server, e.g., "diphtheria".cd easy-rsa vi vars . ./vars ./clean-all ./build-ca
- Create certificate and key for the server.
./build-key-server server
- Create keys for your clients
If you want the keys to be password-protected, use ./build-key-pass instead. Make sure the common name is different for each client, otherwise clients will bump each other off. Hmmm ... on second thought...../build-key bruce ./build-key lance ./build-key mitch
- Generate Diffie-Hellman parameters
./build-dh
- Copy the client key and certificate and the CA certificate to the client's
computer, or give it to the client on a floppy disk.
orcd easy-rsa/keys smbclient //cholera/C$ -U administrator -W workgroup
for Windows XP.smbclient //cholera/C -U administrator -W workgroup
smb: \> cd "Program Files\OpenVPN\config"
put bruce.key  (the key)
put ca.crt     (the CA certificate)
put bruce.crt  (the certificate)
exit
- Copy the keys to /etc/openvpn/keys
su
cd easy-rsa/keys
mkdir /etc/openvpn/keys
cp * /etc/openvpn/keys/
Script for adding a new user
echo creating keys for user $1 cd vpn/openvpn-2.0.2/easy-rsa/ . ./vars ./build-key $1 cd keys su cp * /etc/openvpn/keys/ exit mcopy $1.key a: mcopy $1.crt a: mcopy ca.crt a: echo Change key names in client.ovpn to match $1 nedit client.ovpn mcopy client.ovpn a: mcopy openvpn-2.0.2-install.exe a: |
Adjust Firewall and Server Access Rules
- Open ports 1194/UDP (the new, official OpenVPN port) and 5000/UDP (the old OpenVPN port) in your firewall for both directions.
- Temporarily modify the ``hosts allow'' line in the /etc/samba/smb.conf
file on the VPN server with a line that allows the IP range specified by
OpenVPN to connect.
and restart smbd and nmbd. Notice that this address should be non-routable.hosts allow = 10.1.0.0/255.255.255.0
- Edit your /etc/hosts.allow file on the server to allow the
10.1.0.0/24 network to have access.
ALL : LOCAL 10.1.0.
- Make sure you can connect to the VPN port by typing
It should say "Connection refused", not "No route to host".telnet my-vpn-server 1194
Configure the server
- Copy a sample-config-files/server.conf to ./server.conf.
Note that default port is now 1194. Port 1194/UDP must be
opened on the firewall in both directions.
Set the virtual IP address range to a private range that is not currently used by your network. A private address is in the range
Also, IP addresses in the range of 169.254.0.0 -169.254.255.255 are reserved for Automatic Private IP Addressing, which is used by Windows. Since these addresses aren't part of your network, you will also have to set up NAT on the server. Use "dev tun" unless you are using bridging (but see below). More options are needed if the client has their own network that needs access.10.0.0.0 - 10.255.255.255 172.16.0.0 - 172.31.255.255 192.168.0.0 - 192.168.255.255
Here is an almost-minimal server.conf file:
When "server" is set to 10.1.0.0 255.255.255.0, the server will listen on that subnet and take 10.1.0.1 as its virtual IP address.port 1194 proto udp dev tun ca /etc/openvpn/keys/ca.crt cert /etc/openvpn/keys/server.crt key /etc/openvpn/keys/server.key # This file should be kept secret dh /etc/openvpn/keys/dh1024.pem client-to-client # To allow clients to see each other server 10.1.0.0 255.255.255.0 # Set to virtual network and subnet mask ifconfig-pool-persist ipp.txt keepalive 10 120 cipher AES-128-CBC # AES comp-lzo persist-key persist-tun user nobody group nobody status openvpn-status.log verb 3
-
Make sure tun/tap driver is configured.
If not, activate CONFIG_TUN=y in your kernel configuration, recompile your kernel, and reboot into new kernel. It should create the device node automatically. If not, typels -l /dev/net/tun crw------- 1 root root 10, 200 Mar 23 2002 /dev/net/tun
mknod /dev/net/tun c 10 200
- Enable IPv4 IP forwarding on the Linux server:
This needs to be done every time the computer reboots. If you are using modules, put modprobe tun in the startup script as well.echo 1 > /proc/sys/net/ipv4/ip_forward
Configure the Windows client
In C:\Program Files\OpenVPN\, copy sample-config\client.ovpn to
config\client.ovpn and edit it with Notepad to make it consistent
with server.conf.
Here is an almost-minimal client.conf file for "bruce":
client dev tun proto udp remote carbon 1194 # use real name or IP address of the server resolv-retry infinite nobind persist-key persist-tun ca ca.crt cert bruce.crt key bruce.key cipher AES-128-CBC # AES comp-lzo verb 3 |
For Windows XP, you may have to manually disable the firewall for the tap adapter.
Start server and test the connection
- Start server:
su
./openvpn server.conf
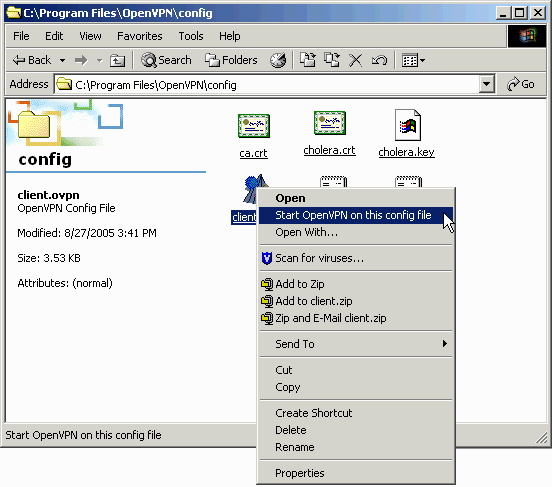
- On Windows client, right click on client.ovpn. A console window will open
and messages should appear on both computers indicating glorious success,
or not.
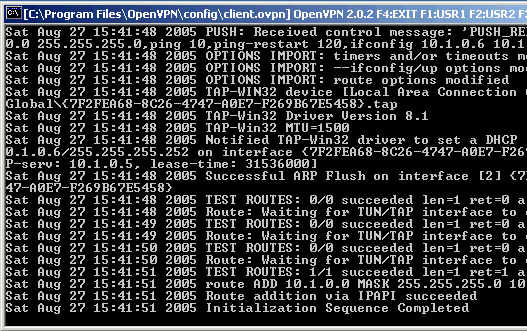
Client console window of OpenVPN in glorious success mode.
Open a DOS box and ping the virtual IP address of the swerver
If you later decide to remove the VPN, click on ``Add/remove hardware'' in the Control Panel and select ``Uninstall a device.'' If you do this, it is necessary to reinstall OpenVPN and reboot before it will work again. To stop the VPN, you can use the Task Mangler or press F4 in the OpenVPN console. Pressing F2 shows connection statistics.ping 10.1.0.1
- Test the connections in both directions by pinging to all four
addresses:
All pings should still work. This behavior is different from most other VPNs, such as OpenSwan.ping 10.1.0.1 ping 10.1.0.3 ping 192.168.100.1 ping 192.168.100.4
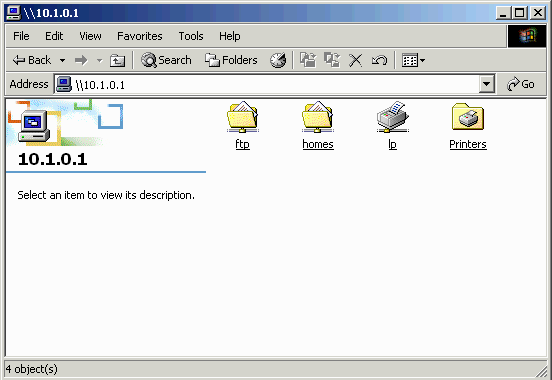
- Click on "My Network Places" on the client and type \\10.1.0.1
in the address box. You should see a list of Samba shares.
Screen shot of the software actually working, sort of - Start tcpdump -n
on the server and observe the traffic when the
client sends a ping or initiates a telnet or ftp session.
Both telnet and ftp should still work.
All packets in both directions should be on port 1194/UDP. However, if the client uses the Windows browser, the server will also send some traffic on ports 137. The only way to stop this is by blocking it with a firewall. In most cases, it is sufficient to block the users using the "hosts allow" command in smb.conf, for example:C:\vpn>ftp 10.1.0.1 Connected to 10.1.0.1. ...
which will prevent unauthenticated users from connecting. They should get a message like this:hosts allow = 10.1.0.0/255.255.255.0

- Check the routing table on the server
Before starting OpenVPN:
After:route Kernel IP routing table Destination Gateway Genmask Flags Metric Ref Use Iface 192.168.100.0 * 255.255.255.0 U 0 0 0 eth0
route
Kernel IP routing table
Destination     Gateway     Genmask         Flags Metric Ref    Use Iface
10.1.0.2        *           255.255.255.255 UH    0      0        0 tun0
192.168.100.0   *           255.255.255.0   U     0      0        0 eth0
10.1.0.0        10.1.0.2    255.255.255.0   UG    0      0        0 tun0
PART 2 - Real World Setup
With this setup, we could also connect to 10.1.0.1 (the VPN server) over a commercial 64k dialup from our ISP. However, tcpdump showed that Windows browsing packets were going around the VPN (i.e., not through port 1194) and were being dropped by the server. To fix this, all that was necessary was to make some minor configuration changes and activate NAT on the VPN server. Now we could get to the Samba servers in the intranet behind VPN server and browse their shares by typing something like "\\diphtheria" in Explorer on the Windows PC named Cholera.
| Road Warrior (Cholera) <-> Telephone <-> ISP <-> Internet <-> Router <-> VPN Server <-> Intranet <-> Windows PC (Diphtheria) |
tracert 10.1.0.1 = 1 hop 1179 ms directly to the VPN server [10.1.0.1] tracert 63.127.146.199 = 10 hops through various servers. |
Changes on server:
- Install iptables(www.iptables.org) if necessary.
- In most Linux distributions, kernel iptables support is already enabled.
If not, see "problems" below. Otherwise,
on the gateway, enter the following commands:
Alternatively, just forward packets on the TUN interface as the manual recommends (I did not try this):iptables -F iptables -F -t nat (gets rid of previous iptables entries) iptables -X iptables -t nat -A POSTROUTING -o eth0 -j SNAT --to 63.127.146.199 iptables -A FORWARD -j ACCEPT iptables -L -t nat (list all rules)
The goal is to perform NAT proxying on the packets before they are sent out the eth0 interface. In this example, 65.198.102.199 is the static IP address of the VPN server. All packets coming in from the road warrior have their IP address rewritten before they leave the server so that their source address is that of the server.iptables -A INPUT -p udp --dport 1194 -j ACCEPT iptables -A INPUT -i tun+ -j ACCEPT iptables -A FORWARD -i tun+ -j ACCEPT iptables -A INPUT -i tap+ -j ACCEPT iptables -A FORWARD -i tap+ -j ACCEPT iptables -t nat -A POSTROUTING -s 10.1.0.0/24 -o eth0 -j MASQUERADE
SNAT is used instead of MASQUERADE because the VPN gateway has a static IP address. - Enable IPv4 IP forwarding on the Linux server:
echo 1 > /proc/sys/net/ipv4/ip_forward
- This should be put in /etc/rc.d/boot.local (or wherever) along with the iptables commands described earlier so they are automatically issued after a reboot.
- Add the following lines to server.conf on the server:
# Advertise name server - change this number to your DNS server
push "dhcp-option DNS 11.111.111.66"
# Advertise WINS server - change this number to your WINS server
push "dhcp-option WINS 11.111.111.196"
push "redirect-gateway"
- Change from "tun" to "tap" in server.conf. With tun, the Windows browser packets try to bypass the VPN, using port 137. The server then rightfully rejects them (if they even reach the server). Because of stuff like this, it's critical to test the VPN with tcpdump to make sure it's actually encrypting all your packets. With the tap interface, browsing packets are sent through port 1194. There is no need to actually set up bridging on the server if you use NAT to rewrite the packets.
Changes on Windows client:
- Change from "tun" to "tap" in client.ovpn file.
- Right-click on the Local Area Connection icon for the TUN/TAP adapter and change the properties to "Enable NetBIOS over TCP/IP".
Results
For the skeptical, here is a screen dump of our intranet Samba server as
seen from a Windows 2000 computer using OpenVPN. The Windows computer is
connected over a dialup and has a dynamically-assigned IP address.

My work here is done.
Configuration files
Server configuration file (server.conf):
port 1194 proto udp dev tap ca /etc/openvpn/keys/ca.crt cert /etc/openvpn/keys/server.crt key /etc/openvpn/keys/server.key # This file should be kept secret dh /etc/openvpn/keys/dh1024.pem server 10.1.0.0 255.255.255.0 push "redirect-gateway" client-to-client keepalive 10 120 cipher AES-128-CBC # AES comp-lzo user nobody group nobody persist-key persist-tun status openvpn-status.log verb 6 push "dhcp-option DNS 11.111.111.11" # add your own DNS server here push "dhcp-option WINS 11.111.111.12" # add your own WINS server here |
Windows client configuration file (client.ovpn):
client dev tap proto udp remote 11.111.111.12 1194 # add real IP of your own openvpn server here resolv-retry infinite nobind persist-key persist-tun ca ca.crt cert cholera.crt key cholera.key cipher AES-128-CBC comp-lzo verb 3 |
Problems
- TLS errors
This could mean your packets are being blocked by a firewall, your certificates on both ends don't match, or the IPs or subnet masks are wrong in your config files. A common problem is that users forget that Windows XP now comes with its own firewall enabled by default. Check to make sure Norton Security or some other security program is not running on the Windows client. It may be necessary to log out of Windows and login again before the changes take effect.TLS Error: TLS key negotiation failed to occur within 60 seconds. TLS Error: TLS handshake failed
- If your kernel does not support iptables,
recompile and install a kernel on the gateway to include the following:
      CONFIG_PACKET
      CONFIG_NETFILTER
      CONFIG_IP_NF_CONNTRACK
      CONFIG_IP_NF_FTP
      CONFIG_IP_NF_IPTABLES
      CONFIG_IP_NF_IRC
      CONFIG_IP_NF_MATCH_LIMIT
      CONFIG_IP_NF_MATCH_MAC
      CONFIG_IP_NF_MATCH_MARK
      CONFIG_IP_NF_MATCH_MULTIPORT
      CONFIG_IP_NF_MATCH_TOS
      CONFIG_IP_NF_MATCH_TCPMSS
      CONFIG_IP_NF_MATCH_STATE
      CONFIG_IP_NF_MATCH_UNCLEAN
      CONFIG_IP_NF_MATCH_OWNER
      CONFIG_IP_NF_FILTER
      CONFIG_IP_NF_TARGET_REJECT
      CONFIG_IP_NF_TARGET_MIRROR
      CONFIG_IP_NF_NAT
      CONFIG_IP_NF_TARGET_MASQUERADE
      CONFIG_IP_NF_TARGET_REDIRECT
      CONFIG_IP_NF_TARGET_LOG
      CONFIG_IP_NF_TARGET_TCPMSS
      CONFIG_IP_NF_COMPAT_IPCHAINS
      CONFIG_IP_NF_COMPAT_IPFWADM
Back