How to upload a file using Apache and PHP
Summary
This article explains how to configure the Apache web server to upload files, with each file going to each user's home directory. It assumes you already have a webserver that supports php. See linuxsetup42.html for details on compiling Apache with PHP support.
Step 1: Edit httpd.conf or .htaccess
Add the following lines to the httpd.conf file:
LoadModule php5_module        modules/libphp5.so
AddHandler php5-script php
DirectoryIndex index.html index.php
AddType application/x-httpd-php .php .htm .html
The first three lines should already be present if php is working on your server. The last line adds support for inline php commands, which are needed to integrate environment variables such as usernames into your xhtml code. Re-start Apache so the new configuration takes effect.
If you don't have permission to change the httpd.conf file, the AddType
command can also be added to a .htaccess file in your home directory.
This may or may not work, depending on the setting of the AllowOverride
line in httpd.conf.
Step 2: Make sure inline php is working
Add the line <?php echo "Inline php is working"; ?> />
into an html file.
Note: inline php will only work if the html file is in the designated
html directory, where the server accesses it. If you load the same html
file by typing "file:// ..." instead of "http:// ... " in the address
bar, it won't work.
Here is a complete html file demonstrating inline php.
<html>
<head></head>
<body>
Test of inline php
<br />
<?php echo "This line will be visible if inline php is working
on this server.";?>
</body>
</html>
When you click on the above page, you should see this:

Step 3: Create the upload form
Here is a complete upload form (upload.html). A real form would also have a more complete doctype header, including a line for the css page to control the formatting, but this example still works.

<html>
<head></head>
<body>
<h4> File uploads </h4>
<form enctype="multipart/form-data" action="../../cgi-bin/upload.php"
	method="post">
<p>
Select File:
<input type="file" size="35" name="uploadedfile" />
<br />

Destination
<input type="text" size="35" name="destination"
       value= "<?php echo $_ENV["USER"];?>" />
<br />
<input type="submit" name="Upload" value="Upload" />
</p>
</form>
</body>
</html>
Notes:
- This file requires a php file called
upload.php(described below), which has to be placed in the cgi-bin directory. - This form has a button for the user to select the source file, and a text area to specify the destination directory. Unfortunately, there is no easy way to select a directory using HTML. We could have added another input button, but it would always get a file, which would confuse the user. So we will get the directory from the user's text string and create a home directory for each user to put their files.
- The default directory is the user's username. This is obtained by reading
the USER environment variable, using the following line of php:
<?php echo $_ENV["USER"];?>. PHP defines a lot of other environment variables, including the server name, script name, date, etc. which can be accessed at any time within your html file. To get a list of these variables, put this line in your html file:<? phpinfo(); ?>.
Step 4: Create the php script
Here is a minimal but functional php script (upload.php) for uploading a file.
<?php

$destination_path = $_REQUEST["destination"] . "/";
$target_path = "../htdocs/" . $destination_path;
$target_path = $target_path . basename( $_FILES['uploadedfile']['name']);

echo "User=" .          $_ENV[USER] . "<br />";
echo "Source=" .        $_FILES['uploadedfile']['name'] . "<br />";
echo "Destination=" .   $destination_path . "<br />";
echo "Target path=" .   $target_path . "<br />";
echo "Size=" .          $_FILES['uploadedfile']['size'] . "<br />";
//echo "Tmp name=" .    $_FILES['uploadedfile']['tmp_name'] . "<br />";


if(move_uploaded_file($_FILES['uploadedfile']['tmp_name'], $target_path)) {
    echo "The file ".  basename( $_FILES['uploadedfile']['name']).
    " has been uploaded";
} else{
    echo "There was an error uploading the file, please try again!";
}
?>
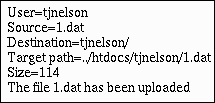
Here is the output from the above script:

Notes:
- This script would be placed in the cgi-bin directory, or wherever the server is configured to execute cgi scripts. The ExecCGI option must also be specified in the httpd.conf file in order for this script to work.
- The script strips the path from the user-specified file and appends the base filename to the directory that the user specified. In a real-world situation, you would have to be careful about this, because a user could type a variety of path characters to upload files in undesirable locations. For example, a user might be able to upload a new password file and obtain root access on your server.
-
move_uploaded_fileis a built-in PHP function. - The upload.php script does not need to have execute permissions.
- The
tjnelsondirectory (located in /usr/local/httpd/htdocs/ in this example) should be writable by the httpd process. - It would be a good idea to hard-code the username in the script, instead of allowing them to change it. Otherwise, your users could overwrite each other's files.
- Making this script secure so your system doesn't get pwned five seconds after you post this form is, as usual, left as an exercise for the reader.
