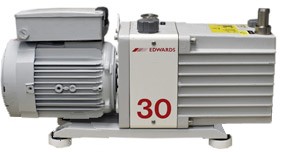
 Edwards e2m30 vacuum pump
 he E2M30 is a high-performance 230-volt rotary-vane vacuum pump found
on many pieces of lab equipment such as mass spectrometers. It has been
replaced by the E2M28, which has virtually identical performance characteristics.
Although it's very reliable, every time you turn a vacuum pump off there's
a risk that it won't start up again. One day we turned off our E2M30 pumps to
move our LTQ six inches to the left. When we tried to power it back up, one of
the pumps seized. After much stroking of our beards trying to decide what to
do, we decided to try to fix it ourselves.
Five years later, I put the 6 kVA UPS on Bypass, not realizing the circuit breakers in the back had been tripped. The entire mass spec including the pumps shut down instantly. When power was reapplied the second pump seized up. We repaired that one as well.
How to tell if pump is seized
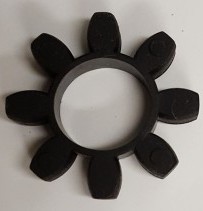
The characteristic sign of a seized pump is a moderately loud bang when power is applied. If the pump is on a UPS, the circuit breakers may trip. To verify that the pump is seized, remove one of the plastic side panels, push against the red ventilation fins, and try to rotate the motor by hand. If it's good, it should turn with a minor amount of force. If it's seized, it will be impossible to turn. You will also notice a black powder inside. This is what remains of the rubber shock absorbers that mechanically insulate the motor from the pump.
Symptoms
The main problem is the pump does not spin. The motor gets very hot and periodically trips the motor's thermal protection. When the motor tries to spin, it pulls over 30 amps. If your mass spec is on a UPS, this will most likely overload it or trip a breaker whenever you turn it on. It will also shred the rubber shock absorber between the pump and the motor. If the motor still works, the problem is in the pump and it will have to be stripped down and rebuilt.
To repair a seized vacuum pump, the pump has to be completely dismantled and every part checked for corrosion and scoring. If you're lucky, it might only be dirt trapped between moving surfaces. There could also be metal parts that have jammed against each other and become badly scratched or scored. These parts have to be polished back to their original condition before the pump will rotate. In the worst-case scenario, a part will need to be replaced.
There are many excellent companies that can rebuild vacuum pumps, but it is a labor-intensive task that can cost over $1000 when you include shipping costs. These pumps weigh over 100 pounds, so you can't just put them in a box and call FedEx. The pump has to be bolted to a sled and shipped by a freight truck. Sending a vacuum pump out for rebuilding can take several weeks. These pumps cost about $6000 when new, but the cost of instrument downtime can be many times that. So it can be cost-effective to do the work in the lab.
Disclaimer: The procedure below is not official. I am not an expert on vacuum pumps. The procedure below worked for us, but might not work for all pumps. Follow it at your own risk.
Materials required
- Edwards rebuild kit (contains mainly O-rings and rubber parts)
- Set of metric hex wrenches
- Several boxes of paper towels
- Sandpaper (600, 1000, and 2000 grit emery paper; diamond lapping film (McMaster) works better)
- Aluminum polishing kit (Mothers or equiv. and a cloth rag. Although marketed for aluminum, it also works well on steel.)
- Hammer and rubber mallet
- 1 quart of vacuum pump oil
- Spray bottle of ethanol or acetone
- Several sets of ear muffs (one for each of your co-workers). This will help drown out your swearing.
Time required
Level of difficulty: medium
Level of mess created: high
Time: 1–2 days
 Shock absorber
Replacing the rubber shock absorbers
The repair kit should contain a black star-shaped rubber item that replaces the shock absorbers. It just slides on over the rotor spindle. It's a good idea to replace this first, in the off chance the problem is in the motor, not the pump itself.
- Remove the four metric bolts that attach the pump to the motor. There may be an oil recirculating fitting in the way. This has to be removed as well.
- Clean the black powdered remains of the previous shock absorber and slide the new one onto end of the motor. Verify that the motor still moves freely and re-attach it.
- Oh yes, unplug the pump first.
Disassembly

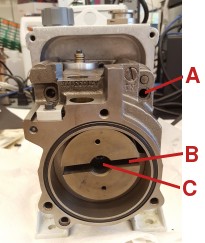
Inside of E2M30 vacuum pump. A = four screws holding the inner and outer chambers together. B = slot in rotor for vanes. C = main hex head screw.
The E2M30 is a two-stage rotary vane pump. Accessing the outer stage is easy.
- Unplug pump and drain out all the oil.
- Remove the 4 long metric bolts on the outer oil reservoir. This is the large rectangular cast aluminum piece on the right side of the photo above. Pull it off and clean any dirt off the sight glass.
- Remove the 3 short metric bolts on the thick steel end plate protecting the vanes on the end farthest from the motor. Don't lose the small O-ring on the inside of the plate.
- Remove the thin stainless steel top plate that holds the three valves in place. Clean them off and put it somewhere safe.
- As each part is removed, check whether the pump begins to turn freely. This will provide a clue as to which part is causing a problem.
- Do not remove the screws holding the inner and outer chambers together (A) in the figure yet. Doing so can cause the pump to appear to jam even further. These screws must be tightened equally and by a precise amount; even a tiny misalignment of the two metal sections will cause jamming.
- Rotate the pump by hand, if possible, by inserting a hex wrench into the large screw (C) in the center of the rotor until the vanes are maximally extended, then carefully pull them out with your fingers. They are made of a very soft plastic. DO NOT use a metal tool to grasp them or pry them out. The vanes are pushed apart by two springs, each of which has a small pin inside. The notched side of the vane goes toward the inside. Clean the springs, pin, and vanes in acetone and polish all six sides with 2000 grit emery paper and aluminum polish if they are scratched, taking care not to change the shape or curvature of the end of the vane. The two vanes aren't attached to each other; don't let them fall apart.
Cleaning the outer section
- Polish the inside of the rectangular slot which the vanes fit inside of to remove any dirt or corrosion, using 1000-grit emery paper wrapped around a small piece of wood.
- Clean and polish the rotor and the circular rim contacted by the vanes. Dirt often collects in the corners, around the rim. If the surfaces are brown, they are corroded and they need to be polished with diamond sandpaper or aluminum polish until they are reasonably shiny. Steel wool is not recommended, as bits of it will get stuck between the rotating surfaces.
- Metal parts could also be catching on the edges of the holes for the valves. Dirt and oxidized oil can accumulate behind the rotor or on the outside of the rotor.
- As dirt is removed, wash it off by spraying ethanol or acetone on each part.
- If the rotor turns freely, replace the vanes in their slot and go to the reassembly step. If it is still hard to turn, the problem might be in the second stage. If so, it will be necessary to separate the two pump sections. However, if the rotor sticks only at one position, it is sometimes possible to sand it down without removing it.
Cleaning the inner section
If cleaning, sanding and polishing don't help, the problem may be in the inner section. This step is more difficult.
- CAUTION: The next steps require taking the two halves of the pump apart. This requires removing the large center bolt behind the vanes. Separating the two halves must be done very carefully to avoid creating gouges in the ground metal surface, which will prevent the pump from being re-assembled properly. One person has reported that when he re-tightened the center bolt, even slightly, the pump would not turn. On our pump, we left the bolt just loosely tightened, and the pump has functioned perfectly for over five years so far. It seems that tightening this bold is not essential. But no guarantees . . .
- The pump is in two sections held together by 3 more metric bolts plus a large metric bolt behind the vanes. This bolt is glued in place and requires lots of torque to loosen. Remove the large bolt and pull out the vane housing. It may be necessary to remove the motor. Once the vane housing is out, clean, degrease, and polish it to get rid of anything brown or black.
- Gently pound on the protruding surfaces of the pump with a hammer to separate the two halves, which are precisely fitted together. Do not pound on any of the smooth ground surfaces, or it will prevent them from forming a good seal later on. It's necessary to pound evenly on all sides. The two halves have very tight tolerances, and must be pulled apart perfectly straight, or they will get jammed. Don't try to pry the two sections apart—this will create score marks. If the two halves get jammed, push the two halves back together and start again.
- Check the inner stage vanes. They are not on springs and should slide back and forth freely. Pull out the large roller bearing assembly, clean any dirt off it, and verify that they spin freely. DO NOT strip the bearings in acetone. Some bearings have internal plastic parts and will be ruined by exposure to organic solvents.
- Check the metal parts for scoring and sand them if necessary, taking care not to widen the gaps between rotating parts.
Re-assembly
Now for the hard part: getting the pump back together. Here is where your co-workers will need those earmuffs.
- After cleaning the insides, reassemble the pump and replace the rubber shock absorber (if it's broken) between the motor and pump with a new one from the rebuild kit. The two pump sections are precisely ground and don't need O-rings, but watch out for two small ones in the bolt holes. They will be brittle and deformed into a square cross-section if they're old. Replace them with new ones from the rebuild kit. Use a rubber mallet to gently pound the two sections together. They must be inserted perfectly straight or they will get jammed. If this happens, pull them apart and try again. If it is still difficult to fit the two pump sections together, check whether one of the rotating joints is scored. If so, use 600, 1000, and 2000 emery paper followed by aluminum polish to remove all scratch marks. Polishing must be done evenly around the entire surface.
- Add a light film of oil to the surface of each moving part before putting it back in.
- It can be tricky to keep large O-rings in their slot, especially when coated with oil. One trick is to hold the O-ring down with a piece of paper and pull the paper out while pressing the steel pieces together. Or if it is a steel plate, you can slide it horizontally to keep the O-ring in place.
- After replacing the large center bolt, re-tighten the bolts holding the two sections of the pump together. If these are not tight enough, the pump will jam up when you tighten the center bolt. This can be very difficult. It's important to make sure the two ground faces are spotlessly clean, there are no gouges, and all the O-rings have been replaced. Once the two sections are together, tap them a few times with a mallet to ensure a close fit. Even a fraction of a millimeter of space will cause binding. Note: it seems not to be necessary for this bolt to be tight. I have run a pump for over four years with no problems after leaving this bolt only minimally tightened.
- Make sure the three valves are correctly oriented and that their springs are inside the center pin of the top plate before bolting it back on.
- Don't forget the little stainless steel Brillo pad on the left.
- Put the green O-ring in the slot of the oil reservoir and re-assemble. This can be a challenge. Cleaning off any oil from the O-ring and its slot will make it easier. Be careful not to break it, because there is no extra one in the rebuild kit. Some pumps may use a cork spacer instead of an O-ring.
- If any oil gets on the floor, clean it up immediately with alcohol (don't use acetone on linoleum!).
Testing
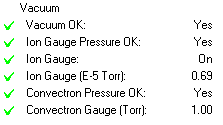
 Vacuum readings on LTQ after repairing the pump.
- Rotate the pump several revolutions by hand. If it turns easily and smoothly, proceed to testing. Add oil to the lowest level, attach the mist filter, and start the pump for a few seconds. The oil level will drop as oil is flushed into the second compartment. If it seizes again, disassemble and polish some more.
- Turn the pump off and add oil to bring the level midway between the two marks. Re-attach the mist filter and vacuum hose.
- With two vacuum pumps attached to an LTQ, and no vacuum leaks, the LTQ's turbomolecular pump should be able to bring the vacuum, measured by the convectron gauge, to 1.00 torr. The ion gauge should go below 1e–5 torr within 30 min, and eventually go below 0.7e–5. If only one pump is working, the convectron will eventually come close to 1.00 torr, but the vacuum will never be high enough for the ion gauge to go on.
- If there is a vacuum leak, squirt methanol at the suspected location and watch for the vacuum to decrease on the computer screen. Alternatively, direct a small amount of helium at the suspected leak while watching the mass spec for a peak at 4 amu. (Ionization isn't necessary to observe this.)
- The pump heat fins should be about 50° C. The motor heat fins should be below 35° C. If the motor feels hot, it is being overloaded.
- Let the pump run a couple of days before running any valuable samples.
- Tell the boss you just saved the company six thousand bucks.
Update (nov 15, 2013) Our repaired pump has been running continuously with no problems for over a year and a half, including oil changes and several on/off cycles. In fact, it works better than before. We are tempted to rebuild the other pump.
Update (sep 30, 2016) The rebuilt has been running continuously for 4½ years now with no problems.
Update (apr 18, 2018)
Joseph Martins writes:
I ran across your article about the Edwards rebuild and wanted to offer another scenario that may present itself as a seized pump.
Edwards rotary vane pumps (as well as other brands) are somewhat sensitive to ambient temps. So much so that a pump that hasn't run for several hours or more may not start up if the room temps are below 50-ish degrees F. I would imagine most folks aren't running these pumps in cooler temps, but during this extra cold New England winter our shop dropped below 50 multiple times.
We're running RV-12s. The hard starts, stalling and non-starting might, at first glance, seem like seized pumps. But we refused to believe several pumps just happened to seize overnight. We tore the pumps down and inspected every square inch. Everything was perfect. We were baffled until we recalled that the manual recommends operating in temps above 12 C.
So we picked up some 4 x 5" plug-in silicone-encased heater pads of the type used for 3D printer beds. They come with 3M adhesive on one side, and are thermo-capped at 80 C. We cleaned off the underside of the oil reservoirs on the pumps and stuck these pads on. Within minutes of plugging them in the oil was up to temp and the pumps started up with no issues.
What we thought might be seized pumps turned out to be viscous oil.
Now we can run these pumps in ambients conditions well below spec.
This wasn't the case with our pump, but it might be worth checking this first.

