Procedure
The first rule in repairing camera lenses is: don't take the iris apart. Well, if you're reading this you've probably broken that rule already. Or you may have needed to repair or clean one of the vanes. Many people think that reassembling an iris is a lot of fiddly, frustrating work, because the vanes are so thin and springy. In fact, it's very easy, but there's a trick.
An iris consists of curved segments called vanes, usually made of springy stainless steel, with a short guide pin on each end. The pins point in opposite directions. They're held between two concentric plastic or aluminum rings. One ring has holes, the other has slots. When the inner ring rotates, one guide pin is fixed and the other slides back and forth in the slot, moving the vanes back and forth.

Iris diaphragm and vane
Trying to fit those vanes back in their holes looks fiendishly difficult at first, but in fact it's quite easy.
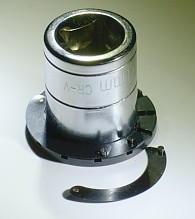
- Obtain a mandrel just big enough for the slotted ring. I used a 14mm socket from a socket wrench. The ring should be tight enough so it doesn't wobble back and forth. Put the slotted ring on it with the slots facing up.
- Put the vane pins in the slots, lining them up in the fully open position, so that they overlap. The first two-thirds of the vanes will fit right in. The rest will be blocked by the existing vanes.
- Slide the remaining vanes under the existing vanes from the outside. The pin should slide right into the slot. It's not necessary to bend the vanes to do this.
- Place the ring with holes on top so the pins line up with the holes. The mandrel will ensure that they are evenly spaced. Make sure the slot, which is for the lever, is oriented so the lever can move freely to the closed position.
- Remove the iris from the mandrel and use forceps to nudge any misaligned pins into their hole.
- Seal the two halves together. Metal irises usually use a retaining ring. Plastic ones may have been ultrasonically welded, in which case they may need glue.
- Re-attach the lever to the inner ring. In most cases it will just screw in using a 0-64 or similar thread.

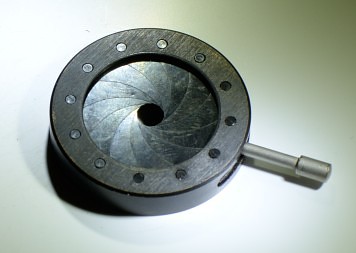
Reassembled iris diaphragm
Disclaimer: all the iris diaphragms I've seen work this way, but there might be other types out there that are made differently. Many irises in camera lenses have plastic vanes. These are similar, but are best left untouched. The iris shown here was purchased as an optical component. If your iris comes from a disassembled camera lens, reassembling the iris could be the least of your problems.
